The Mediated Machine: Embracing Digital Technology as a Glass Artist and Student

School of Art, Kent State University, Kent, OH 44242, USA
Arts 2019, 8(1), 32; https://doi.org/10.3390/arts8010032
Submission received: 30 November 2018
/
Revised: 22 February 2019
/
Accepted: 28 February 2019
/
Published: 6 March 2019
(This article belongs to the Collection Contemporary Glass Art: Materiality and Digital Technologies)
Abstract
:In this essay the author discusses the benefits of introducing digital making tools into the glass artist’s practice-based research, both on a professional and student level. Using an example from his personal creative practice as a case study, the author outlines not only the practical benefits of using digital technology, but how when combined with traditional hot-worked glass techniques the synthesis can produce art objects that would otherwise be impossible using either digital or manual means alone. He argues that it is the possibility of inventing novel approaches to art making that can motivate glass artists and students to embrace digital means of making, rather than relying on appeals to practicality and efficiency alone. Includes a description of producing blown glass sculptures that combine fused water-jet cut sheet glass with traditional mold blowing and glass sculpting techniques.
1. Introduction
Glass as a medium for artistic expression owes its existence to technology. Prior to the experimental and historic glassblowing workshops put on by Harvey Littleton in 1962, only glassworkers and designers working in factory settings had access to the material (Ward 2013). Nevertheless, for all its reliance on technology glassmaking has traditionally been manual in nature. Although tools are used to manipulate glass, they all depend upon hand skill for their operation. It takes great persistence and practice to learn to manipulate the material, in either its liquid or rigid state. However, recent developments in digital technology can provide new tools and opportunities for the glass artist and glass student if they choose to engage with these new media. Using a case study from my personal practice-based research, this paper will illustrate how a glass artist’s adoption of digital technology can reveal novel avenues for both technical and conceptual research, resulting in art objects that would be difficult (or impossible) to conceive or realize by digital or manual means alone. In addition, by focusing on how novel syntheses of digital and hand-made processes can create new, previously un-makeable works, students can be motivated to use digital technology in their practice.
2. The Glass Artist and Digital Technology
Glass as an artistic medium is fairly young and owes its existence to technology. It was only in 1962 that the Toledo workshops introduced this material to the studio artist. Organized by Harvey Littleton, the first workshops utilized a small, inexpensive glass furnace devised by Dominick Labino and based on new technological advancements—specifically low-temperature melting glass marbles used to produce fiberglass (Wright 2011). These successful glass-working experiments were proof that small, individual glass studios were possible. In essence, the practical application of new technologies1 had increased access to the material of glass, however, manipulation of molten glass by artists has mainly proceeded along traditional, hand-worked lines. From traditional bench tools for hot-working glass—jacks, tweezers, sheers, blocks, etcetera—to the saws, lap-wheels and lathes used to cut, grind and polish glass, or the torches used to manipulate borosilicate glass for flameworking, or the mixing and application of refractory mold material for glass casting, all these tools and materials rely to some extent on manual dexterity and skill for their successful use.
So, at first glance it might not be obvious how digital fabrication tools and techniques—computer aided design programs (CAD) and computer numerical controlled (CNC) machines—are applicable to a glassblowing artist’s practice, given the hand-made nature of blown glass. However, engaging with these contemporary making tools can provide opportunities that would be impossible or very difficult using traditional handcrafting methods alone. The reverse is also true: inserting the hand into the digital fabrication milieu can create opportunities that CAD-based making alone cannot provide. As Lucy Johnston writes in Digital Handmade: Craftsmanship in the New Industrial Revolution, “Through combining the precision and flexibility of the tools of digital fabrication with the visual quality and tactility brought by the traditional tools of craftsmanship, the modern artisan is empowered to take the best of both worlds and create a new one” (Johnston 2015).
In the context of this discussion “digital technology” refers to media and machines that assist directly with the making or forming of an artist’s artifact: specifically, applications and software that can generate files that are read by CNC machines, and refers to the machines themselves. Digital or CAD technology here includes (but is not limited too) 2D and 3D modeling applications like Adobe Illustrator, AutoCAD, Rhinoceros and Sketchup which can generate files that can be read by CNC routers, lathes, plotters, laser cutters, water jet machines and 3D printers. There are other instances of digital technology used in glassmaking: the controllers and computers that run the glassblowers melting furnaces, reheating furnaces, casting kilns and annealing ovens. However, for the purposes of this paper they are not included when referencing digital technology, as they do not interface with CAD technology to produce artifacts.
It might appear that digital fabrication techniques and traditional glassmaking are at odds. Where glass is a fairly direct medium—its malleable surface accepting and recording each mark of the maker—work by digital means is often indirect. However, they have more in common than one might expect. Both mediums are difficult to master, requiring many hours of deliberate practice and work. Molten glass is extremely hot, heavy, constantly falling, and needs to maintain a minimum temperature or it will crack. It is a frustratingly mutable material, dripping like glowing honey from a blowpipe one moment and cracking into shards the next. It takes years of deliberate practice to achieve a level of technical acumen that allows the glass artist to readily express their artistic voice in glass.
Ironically, despite existing almost entirely in a digital environment, digital technology has that in common with manual glass working. To begin with, the interface of the software—AutoCAD, Rhinoceros, Sketchup and the like—is complex and relatively opaque. In essence each program is a medium itself, each of which, like glass, requires a lot of dedicated time to achieve proficiency. Moreover, the medium upon which the CAD machine works is often an intermediary one. One might 3D print wax to generate a blow-mold or CNC route Styrofoam to be molded and eventually cast in glass or cut vinyl for a sandblasting resist. The CNC machine is not working on glass itself, rather another material that is merely a step in the process. So, to utilize CAD not only would the glass students need to learn the software medium that will control the CNC machine, but understand the intermediate material—wax, foam, plastic, vinyl, etcetera—and understand glass.
From this point of view the injection of digital technology into the process in some ways negates one of its presupposed benefits: that technology will allow for greater ease of production than hand rendering might. This is often where students reject pursuing CAD as part of their practice. Take the example of using a vinyl resist for sandblasting a pattern into glass. If it is less time efficient to create a design in CAD software and cut it out on a CNC plotter than to simply trace the design and cut it out by hand, what is the motivation for the student to undertake the challenge of learning the software? As teachers we can argue that it is to generate a more accurate and refined decal. So, perhaps the student might trade immediacy for precision. However, in that case it is a fairly easy leap for the student to accept the hand-rendered design as “good enough” for their purposes, because they have not been exposed to the visual difference of the CNC-cut resist. So, practical considerations of efficiency or accuracy might not be enough to motivate a student who—being a glass student—is already deeply committed to hand craftsmanship and steeped in manual making.
In fact, it might be argued that appealing to the practicality and efficiency of digital production might actually backfire as a means of motivating the glass student. As a glass instructor I have had many discussions with my students over the years regarding the importance of the artist’s hand in making art. One of the artists who is frequently discussed in reference to glassblowing is Dale Chihuly. Most often he is the object of derision amongst my glass students, which is surprising given that Chihuly was the first recipient of the first National Living Treasure award for “Americans who exemplify the highest levels of creativity and execution in their fields” (The Seattle Times 1992). A little background: after losing his eye in a car accident in the 1970s Chihuly no longer blows glass himself; instead he orchestrates a team of glassblowers to produce his designs. By 2007 Chihuly employed about 100 people in his Seattle studio (Zax 2007). It is precisely because he does not make his own work that my students do not value his work. They have said as much. This is not surprising, given that much of the value they place on their glasswork comes from the technical achievement of making it. They do not see themselves as merely designers, but as makers able to embody their ideas. This is often their very definition of an artist: a creative person who expresses themselves through media. So, because they place such high value on making their own glass and see making as integral to being able to define themselves as artists, it logically follows that someone who does not make their own glasswork is not seen as a “real” artist by them. They see Chihuly’s use of assistants is a concession to efficiency. They argue that if he worked really hard he could make his own glass, although maybe not as much in the same timeframe. The efficiency argument is easy to reject because, one can argue, the most efficient thing for a glass student to do to realize their ideas would be to hire a skilled glassblower to make them. This undermines one of the main ways they are engaging with the material: that of acquiring the skill to manipulate it by making.
In short, students seem to think that if they give in to technology’s lure of ease of production then something will be lost. If there was a way of digitally blowing glass that negated the need to learn the manual processes, then that might be a concern, but (thankfully) that is not yet the case. By appealing to students’ desire to create something new, and to (possibly) discover unique combinations of approaches, we might motivate students to engage with digital technology in their practice. Students can be led to understand that embracing CAD technology does not mean giving up on manual production. As Barry X Ball2 said a recent interview in Sculpture Review, “There are sculptors who look at it that way—that something will be lost if you give in to this technology.” He continues: “Despite the use of 3D digital scanners, 3D modeling programs, CNC robots and mills, a large sculpture of mine could still need 10,000 hours of handwork to complete. I have not eliminated handwork; I’ve just used the robot to help me get to that point a little quicker and better” (Shull 2019).
So, practical considerations do come into play when considering the use of digital technology; I am merely calling into question using them as a means to motivate students to engage with these new technologies, and motivation certainly is needed. In a survey of 102 students at Kent State University’s School of Art, 86% said they “think digital/CAD technology is important in art-making today” and 78% also said they “wish they did/could use digital/CAD technology more often” in their art-making. However, of those surveyed only 23% used digital technology either “Frequently, by choice” or considered it “an essential part” of their art-making practice. Furthermore, only 2% had any familiarity with Rhinoceros, one of the easier to use 3D rendering CAD programs, with the majority of students’ digital experience being in Adobe Photoshop or Illustrator. For the glass student who is already putting in an incredible amount of work to learn their chosen medium, considerations of efficiency may not outweigh those of taking on yet another frustrating medium.
Despite practical considerations, I argue that the real benefit of utilizing digital technology arises from the unexpected combinations of materials, techniques and processes that result from exploring new techniques for making. As Johnston writes, “the emerging freedom of the craftsman to challenge the tools of the digital revolution, alongside the traditional tools of manufacture, brings an element of creative magic to the process” (Johnston 2015). In other words, combining digital and manual techniques feeds the research itself, generating novel approaches to glassmaking, and often causing the original idea to evolve. In my research I find the use of CAD technology not only increases my efficiency and accuracy in making, but also provides as yet unimagined ways of realizing my vision. What could be greater motivation? The following is an early example of a digital-handmade sculpture series from my own practice-based research that I believe illustrates how a combination of digital and manual processes can yield novel research artifacts.
3. A Synthesis of Hand and Machine: A Case Study
Since 2005 my work has revolved around issues of identity and environment. I am originally from the Cayman Islands and became interested in the ways my natural and cultural environment impacted my notion of self. I began to use natural patterns to represent the marine environment that surrounds my homeland. There was a visual connection between waves on the water, ripples in the sandy seabed and the reticulated patterns of the tropical fish and coral that lived in those waters. Moreover all these patterns were strikingly similar to the fingerprints on my hands. It struck me that there was a connection between the patterns of the sand, the patterns on the fish that swim over that sand, and the patterns on my hands, which I use to catch those fish. When viewed simply as patterns they are indistinguishable; I am the landscape and the landscape is me. These early works were, in a sense, self-portraits, but not in a traditional way.
Recognizing this thread in my work, in 2010 I decided to return to traditional self-portraiture by sculpting a self-portrait bust. Simultaneously I was still researching natural patterns from my native environment and discovered a new one: the Lionfish, Pterois volitans (red lionfish) or Pterois miles (devil firefish). Originally native to The South Pacific and Indian Oceans (i.e., the Indo-Pacific region) the Lionfish had become established in the Atlantic and Caribbean basins by the early 2000s (NOAA 2018). I first heard reports of this species in Cayman after hurricane Ivan in 2004. The National Oceanographic and Atmospheric Administration for the US Department of Commerce speculates that, being popular ornamental marine aquarium fish, they were released into the Atlantic (NOAA 2018). I was struck by how radically different (and yet familiar) the patterning on the Lionfish was, and was also fascinated by the story of how they may have come to invade Cayman waters. Fish from the antipodes of Cayman were shipped halfway around the world for the amusement of aquarium owners and were either released into the Atlantic or escaped during hurricanes. This alien species was now threatening the biological balance of the marine ecosystem on Cayman’s reefs, because they are “a top predator that competes for food and space with overfished native stocks such as snapper and grouper” and “have no known predators and reproduce all year long; a mature female releases roughly two million eggs a year” (NOAA 2018). Reflecting on the circumstances surrounding the Lionfish invasion, I could not help but think that without humans lionfish would never have been transplanted so suddenly into an ecosystem that had not evolved with them. I thought it might be interesting to overlay the patterns of the Lionfish onto a model of my head, provoking a simple question: who is really the invasive species here?
Glass seemed to me the perfect material to capture the luminescence and the color of a tropical fish. I also wished to create a series of these sculptures as a hint at the multiplying nature of the invasives. I conceived of several solutions to this problem. Although the majority of my training has been in glassblowing, I often use other techniques in my practice: casting, slumping, fusing and paté de verre [glass paste], and enameling, all with their foundation firmly rooted in the tradition of hand crafting. I could screen print enamels onto the surface of sheet glass or a transfer decal material, but even high-fire enamels tend to lose some of their brilliance at the high temperatures required for manipulating glass. Alternately, I could manipulate the hot glass into a model of my head first, and then use lower-temperature enamel and apply the pattern onto the surface of the glass when it was cold and then fire it on. However, this would mean rendering the patterns repeatedly onto the surface of multiple sculptures, and I wished to have a more time-efficient way of working than that. Also, I would lose the opportunity to see how the blowing and sculpting process morphed the pattern around the portrait. I enjoy this visual evidence of the process of working molten glass: seeing how the pattern is distorted during manipulation of the material. I would either lose that effect or have to imitate it if I applied the pattern after the heads were already sculpted. Of course, I could solve the problem of color intensity and luminosity by using glass powders that are designed to be worked at high temperatures to begin with. However, it was problematic to apply a thick enough layer of color to the surface to prevent fading during the blowing and sculpting process.
A chance encounter solved all of these problems for me when, in 2010, I ran into a former colleague that worked at a water jet cutting company. He mentioned casually that you could water jet cut sheet glass. Suddenly I had my solution. Instead of applying the pattern onto the surface, I could make the pattern in surface of the glass, a part of the material itself. I could immediately imagine using transparent and opaque glasses to achieve various effects. Since I was cutting the pattern with the computer-controlled machine, I could work within several thousandths of an inch tolerance. This means I could easily mix and match color patterns by simply swapping out various sheet glasses.
In this case CAD technology solved several problems at once: repeatability, efficiency, accuracy and material concerns. It is a perfect illustration of how digital technology can be an asset to an artist. I could have achieved a similar result by using a diamond scroll saw and manually cutting the pattern from various colored sheet glass, but it would have been immensely time-consuming and far less accurate. By contrast, we were able to cut a full pattern from 1/8th inch sheet glass in under 30 min using the water-jet. I was able to cut five full patterns in a few hours, even though each pattern consisted of over 120 parts.
The ease of reproducibility and efficiency that water-jet provided also solved another problem: risk. I was going to fuse each pattern into a solid glass sheet, reheat that sheet and wrap it around a bubble of hot glass. Once the two had been completely fused and the seam sealed, the glass would then be intensely heated and lowered into a graphite-coated plaster mold that contained a rough form of my head. This mold would provide the general shape of the portrait into which I would then hot-sculpt details and manipulate the final form of the sculpture. At any point in this process it is easy to make a mistake and ruin the entire piece. Because the ease of reproducibility provided by the water-jet machine made each iteration of the pattern less precious—from the standpoint of the labor that went into making it—it liberated me to take risks that would have been harder to justify if cutting the pattern by hand.
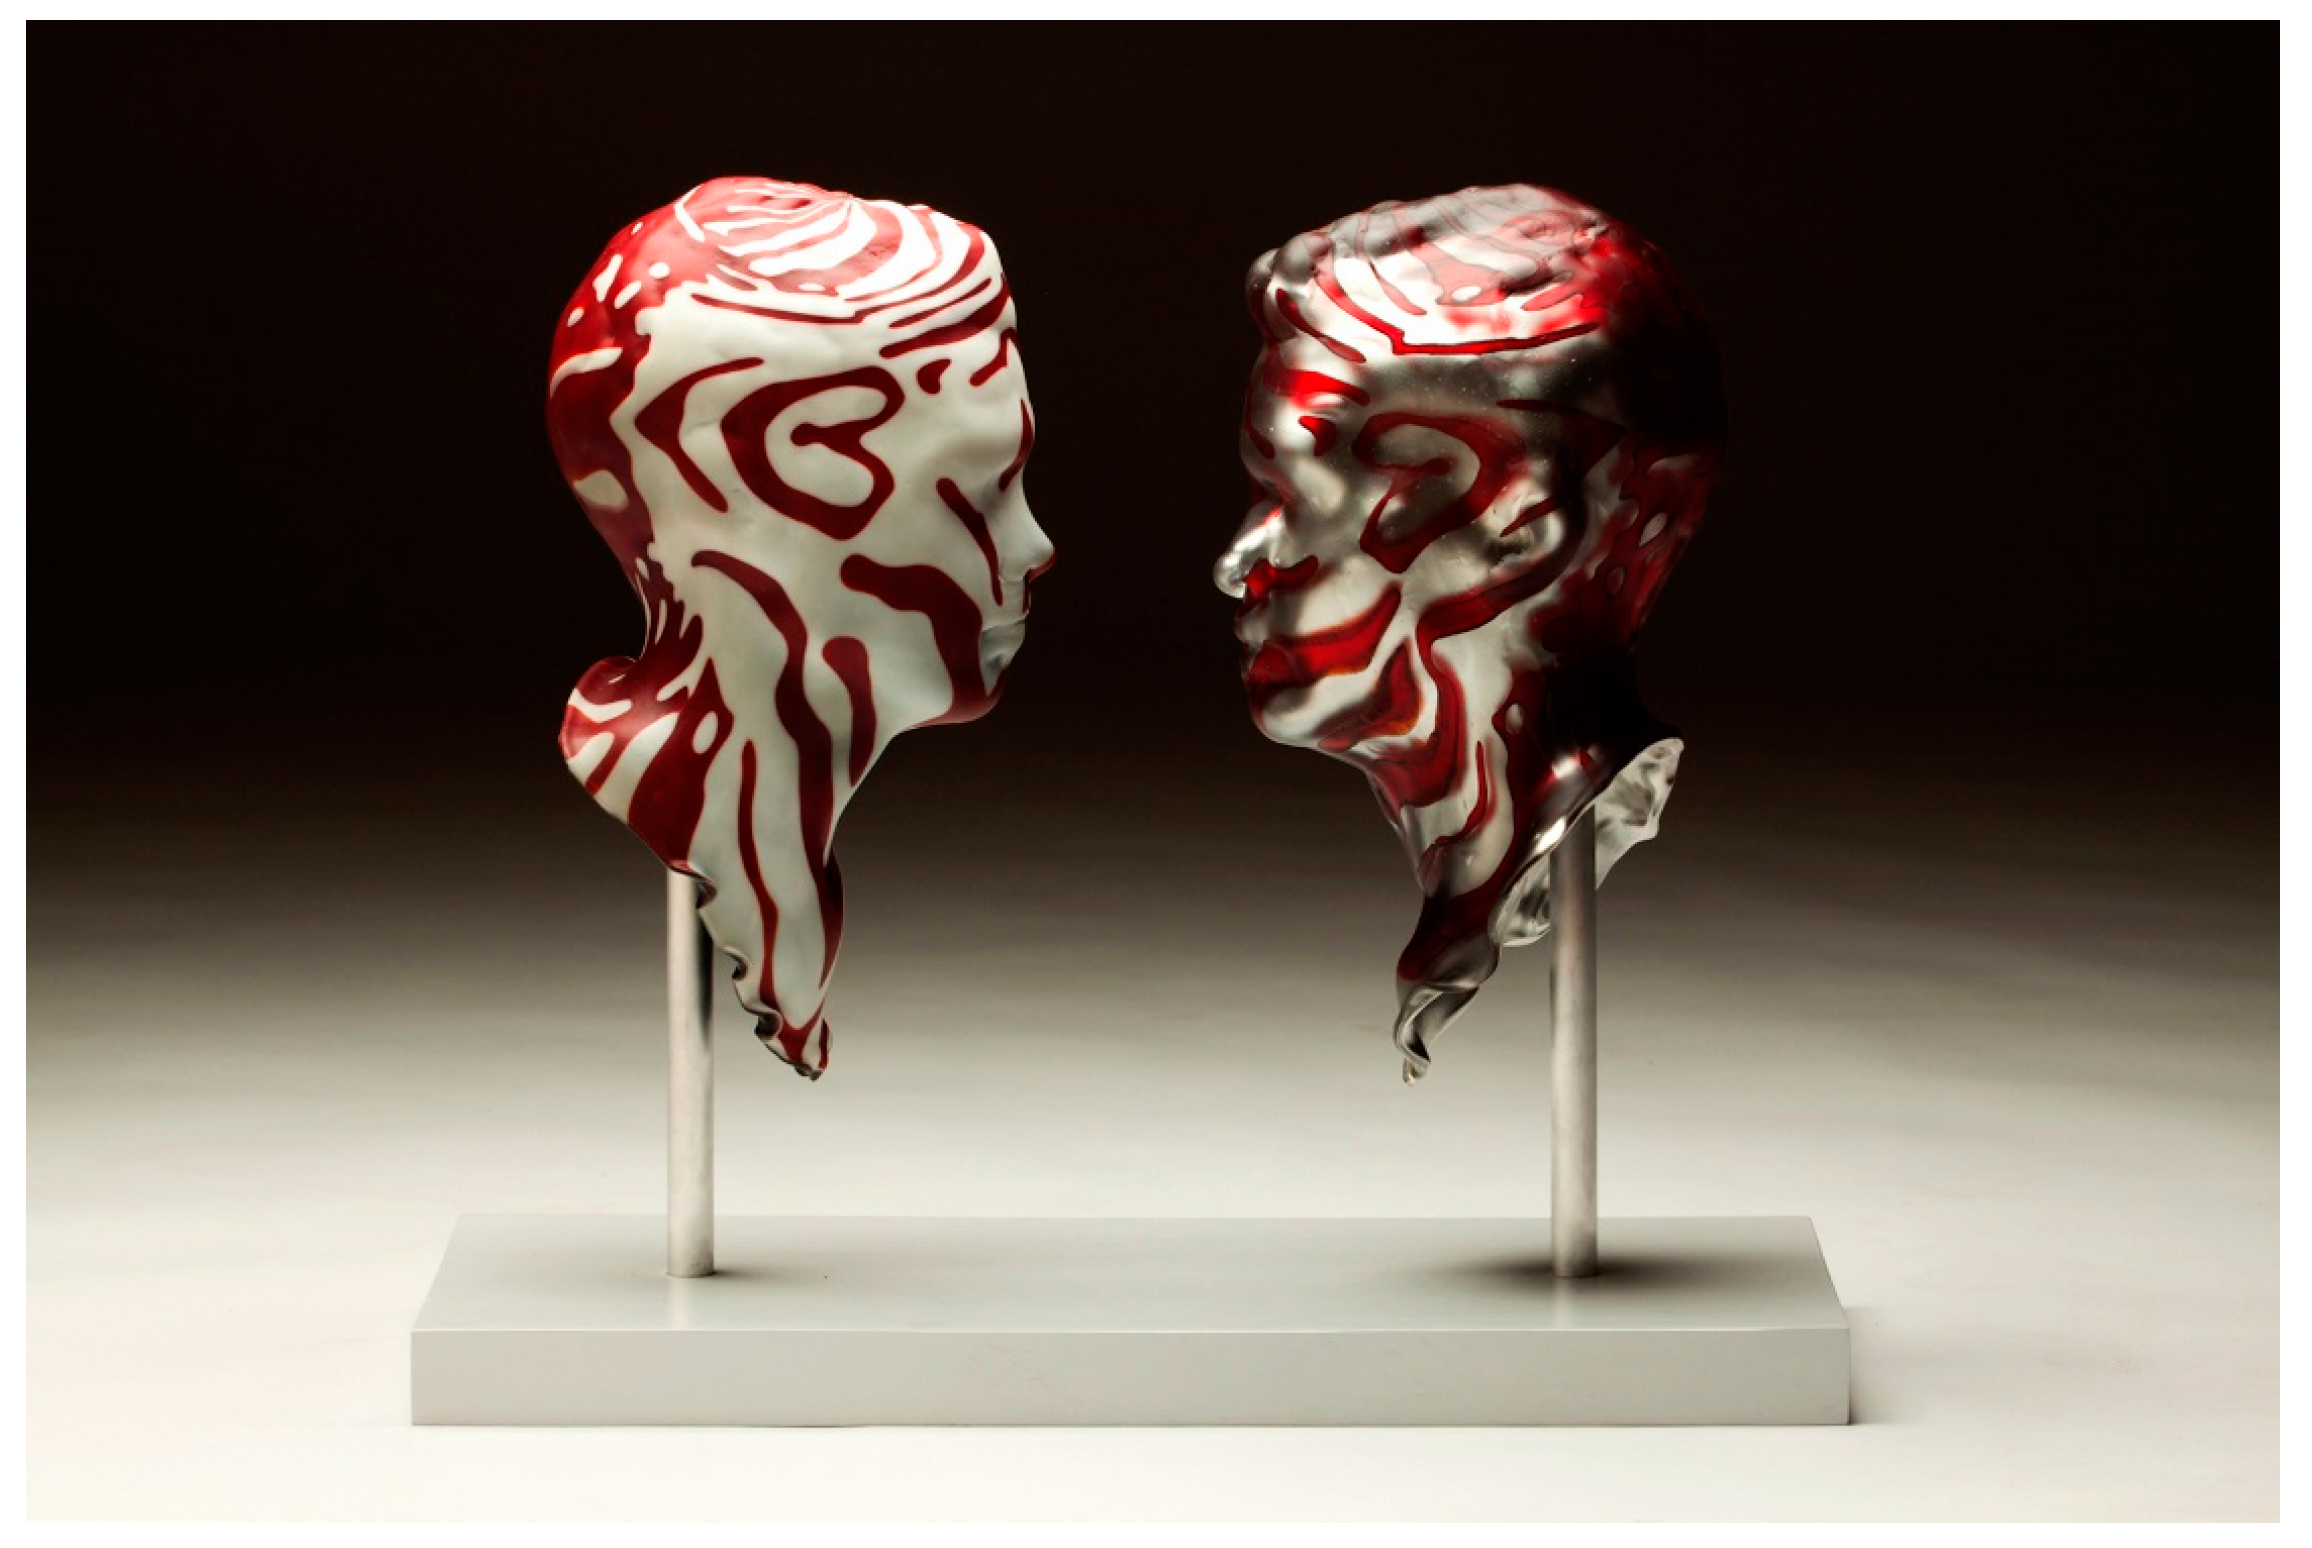
By being open to a CAD-based solution to my technical and visual problem I discovered new possibilities of combining the machine and the hand to produce sculptures (Figure 1), one that could not be made by either on its own. In other words, CAD provided artistic opportunities that I did not have before and enriched my technical vocabulary, not only in the realm of the digital, but in glass as well. I began to think about the material in a new way and imagine possibilities I never would have before.
3.1. Step One: Generating the Pattern
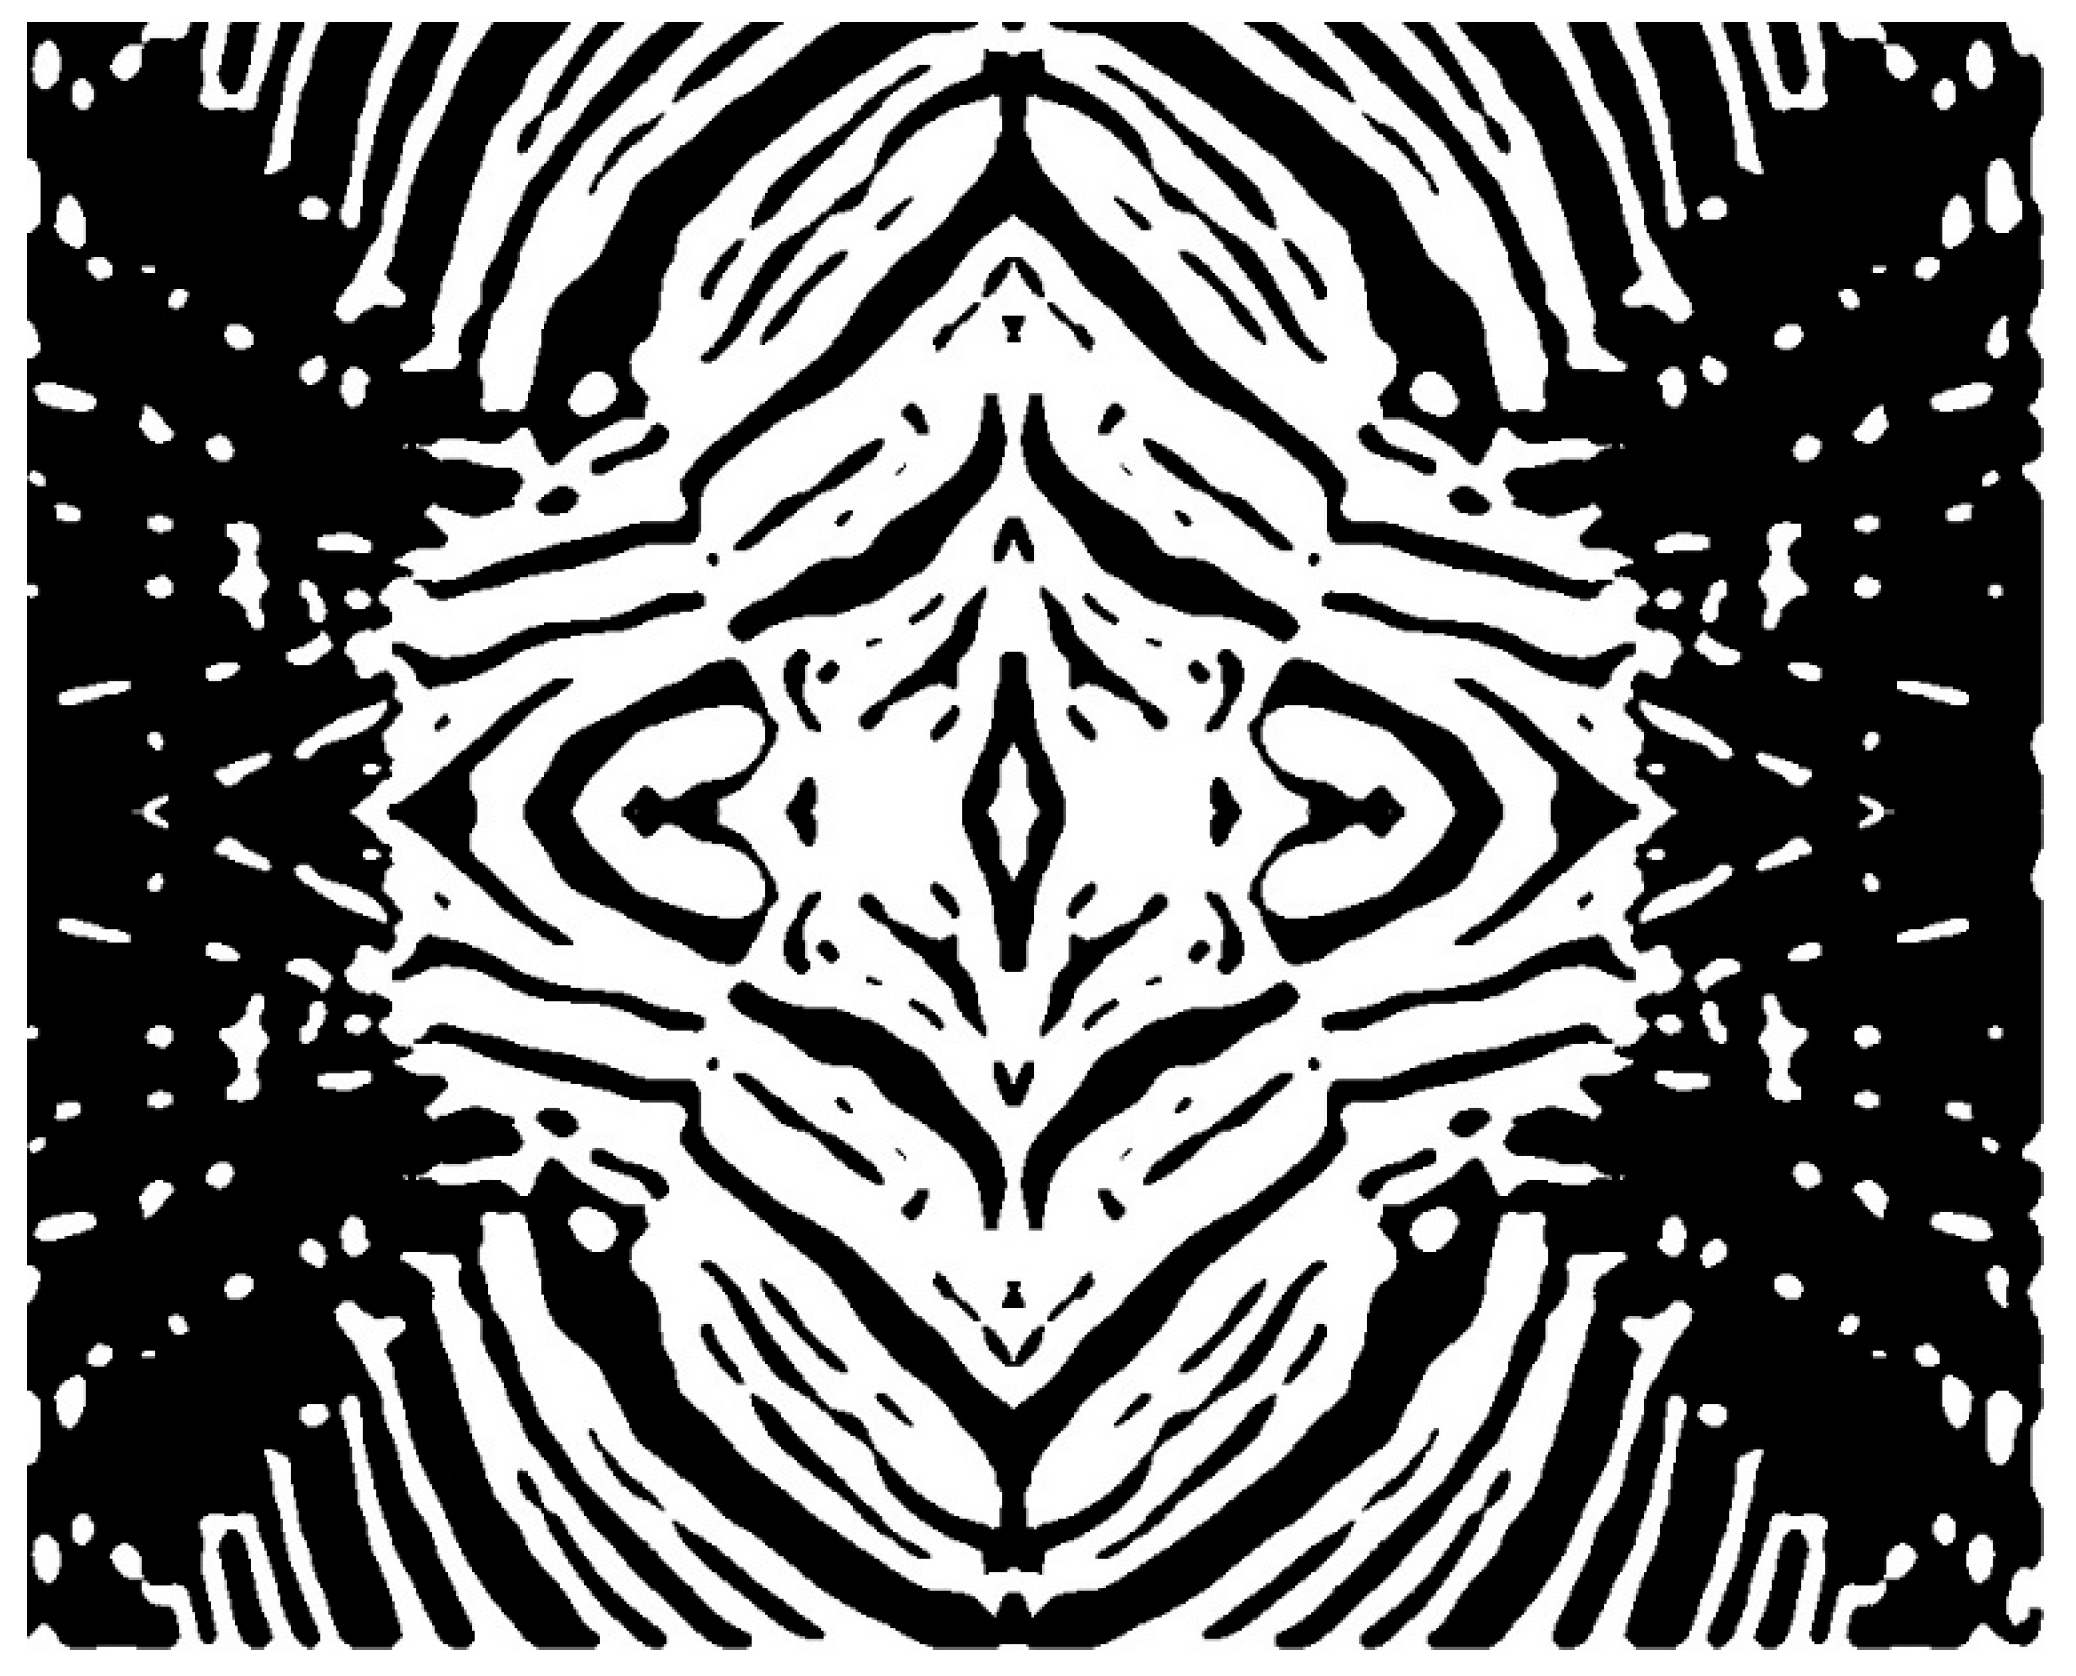
The project began with a design generated from a photograph of a lionfish. I imported the image into Adobe Photoshop and manipulated it to create a black and white symmetrically mirrored pattern. This was imported into Adobe Illustrator and I used the “Live Trace” function to convert the pixelated image into a vector-based graphic (Figure 2). I then used “Live Paint” to render the outlines of the objects and then that layer was duplicated.
Once copied the negative white spaces between black forms were connected using the Pen tool to create closed forms. This step is essential since you need to cut both the positive and negative spaces out as individual shapes in order to create the full pattern in sheet glass. Basically you need to treat the negative white “spaces” as solid shapes themselves, with their outer boundaries being the edge of the pattern. The resulting layers—one of white shapes and one of black—are then copied into separate files. They are then saved as .DXF files that can generate a tool path for a CNC machine, like a water jet.
3.2. Step Two: Preparing the Tool Path for the Water Jet Machine
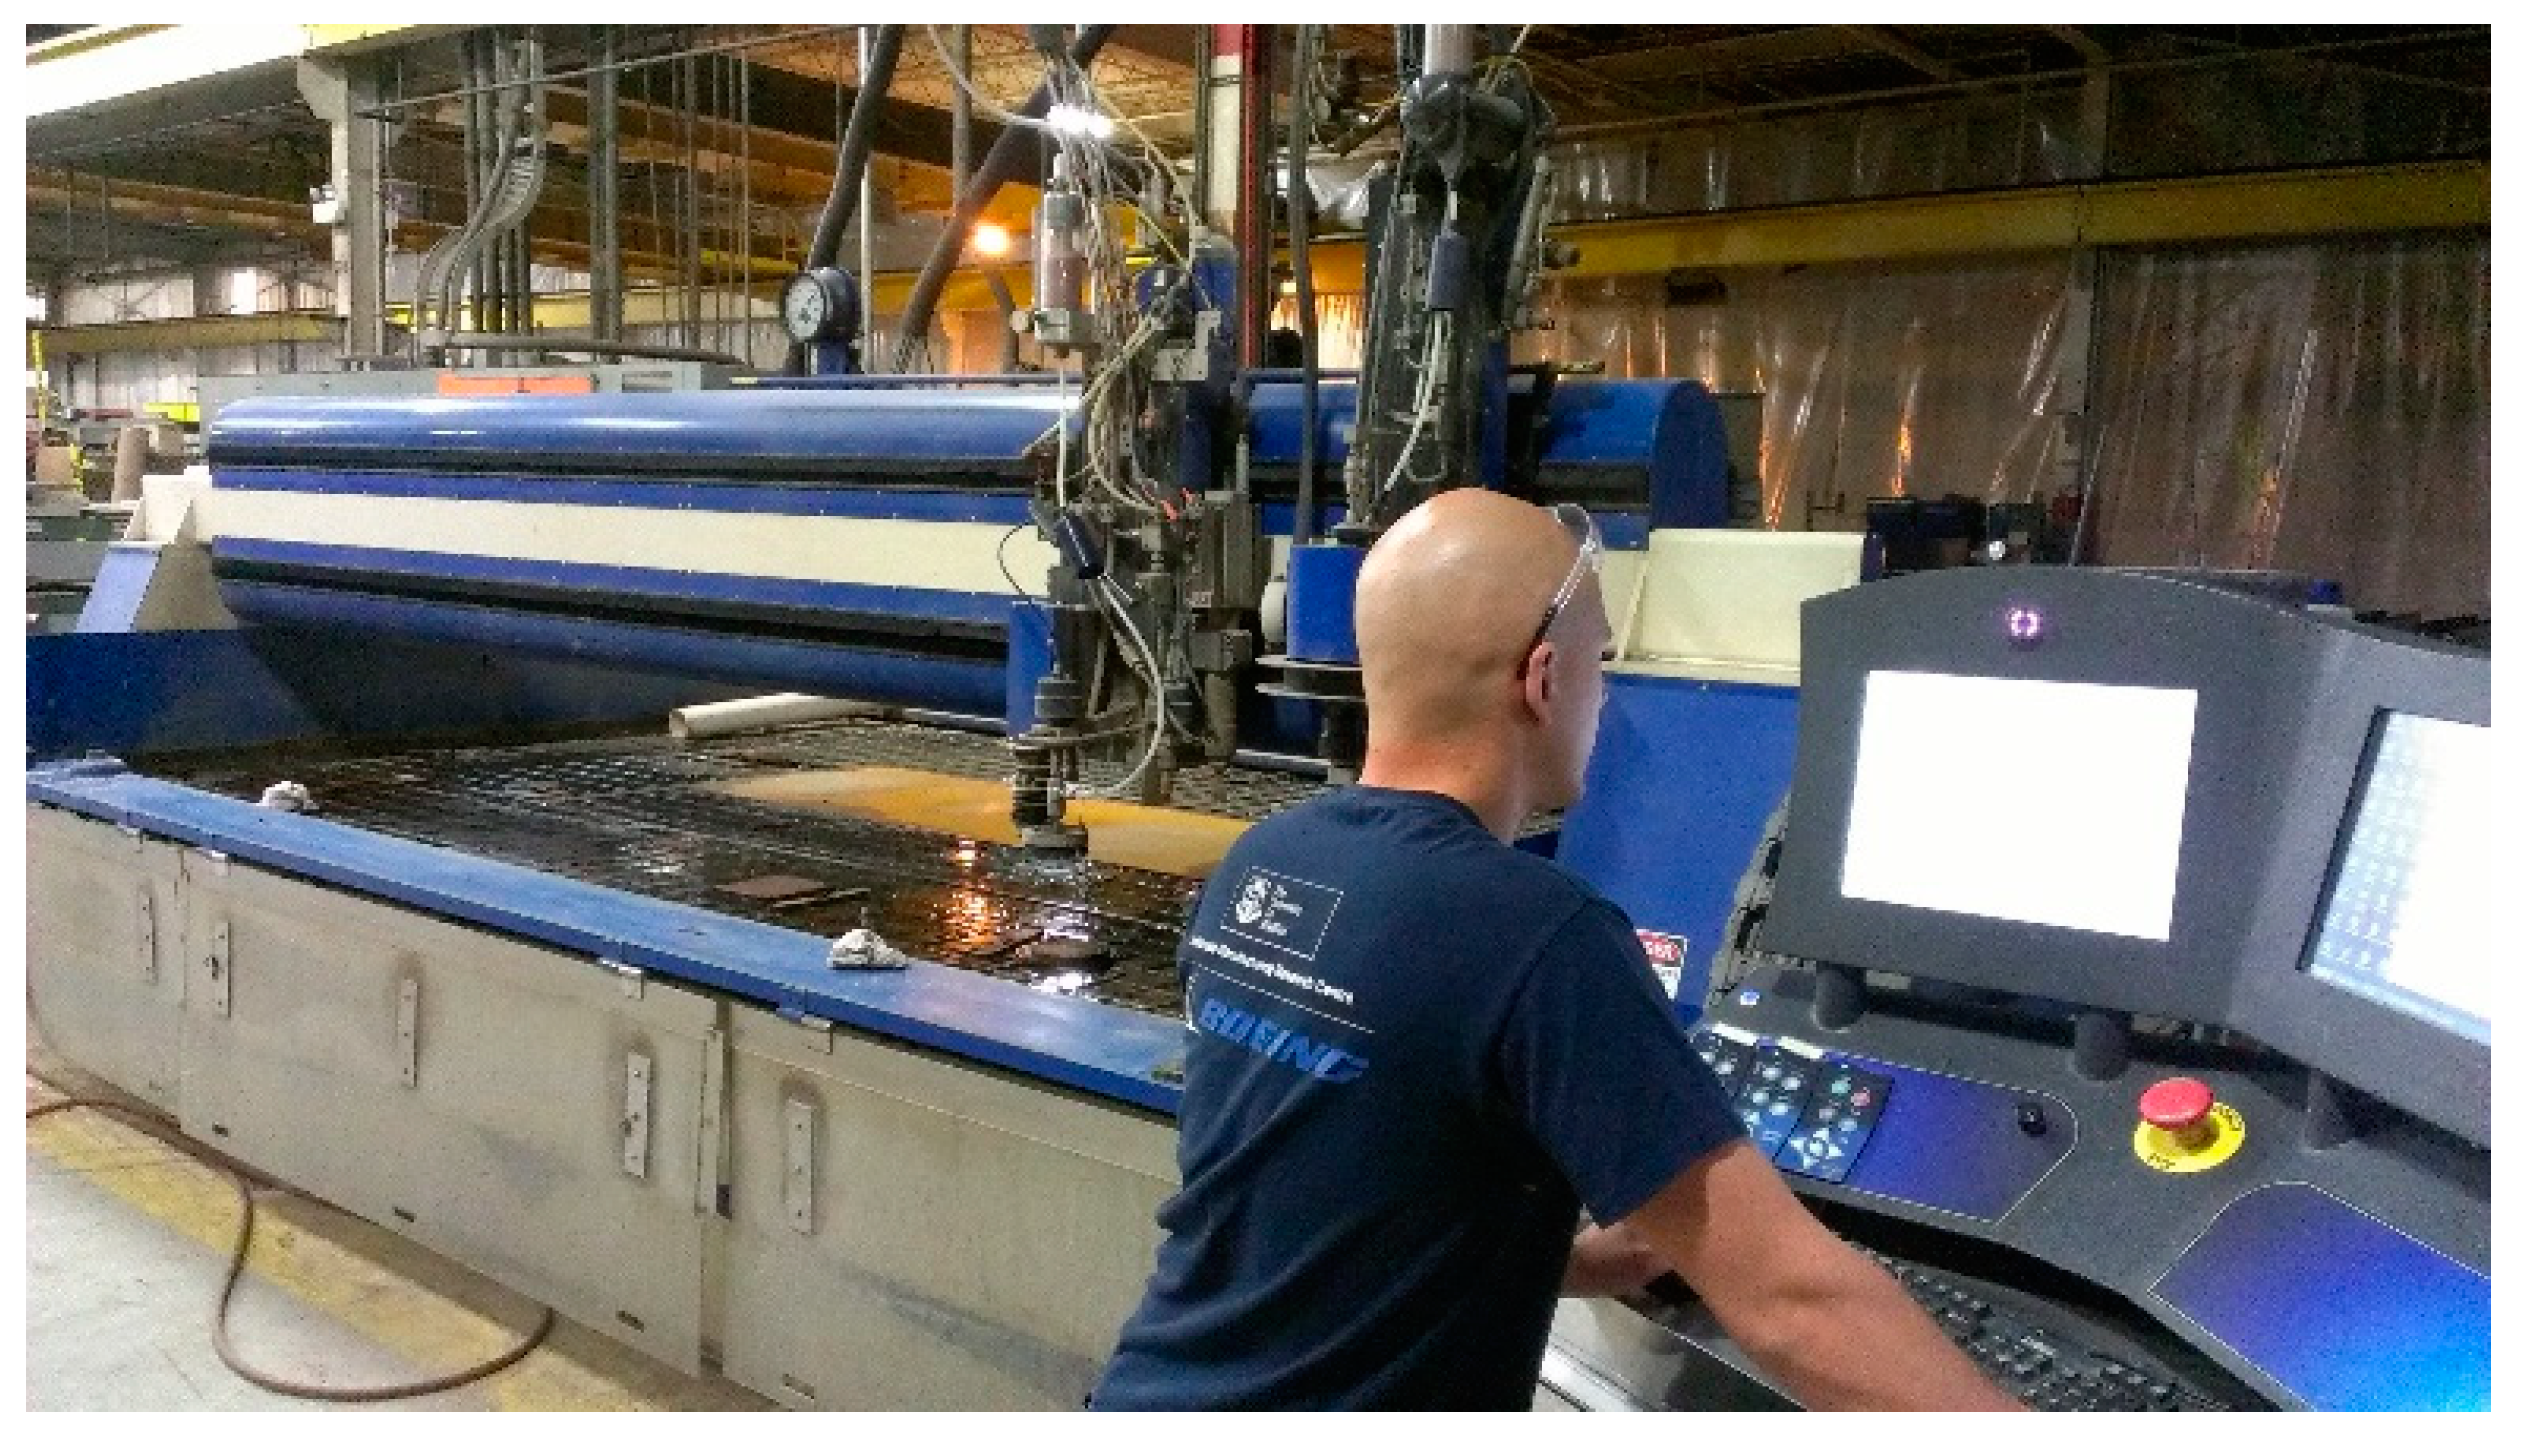
The files are taken to the water jet machine technician for debugging and optimizing (Figure 3). They are tested with a program that searches for any breaks in the tool path that might cause the machine to pause in its cutting, possibly breaking the glass, or worse, the machine might not recognize a broken line as a shape and ignore it altogether. Once the paths are checked software arranges the individual parts to make the most of your raw material, in this case System 96 sheet glass. The technician then adds “tabs” that connect each of the smaller shapes, essentially creating one large part. This is to prevent tiny parts from simply falling through the substrate into the pool of water below3.
3.3. Step Three: Preparing to Cut
The sheet glass is placed onto the water jet machine and the machine is “zeroed in” by calibrating it to all four corners of the glass. That way it will know where to place the part within that space and will not cut beyond the borders of the glass.
3.4. Step Four: Cutting the Glass
To begin any cut that starts away from the edge of the glass the machine must be programmed to “burrow” a hole into the glass slightly away from the part it intends to cut. It does this by making tiny concentric circles, which dissipate the force of the jet. If hit in a single point by the jet the sheet glass can simply shatter. Once the hole is bored the cut can proceed as usual. Luckily with 1/8th inch sheet glass it is easy to punch the hole and the cut proceeds rapidly thereafter. In fact, the operator my need to increase the speed of the nozzle path in order to prevent excessive erosion along the edges of the parts, which could lead to problems with air bubbles later on in the process.
3.5. Step Five: Clean Up
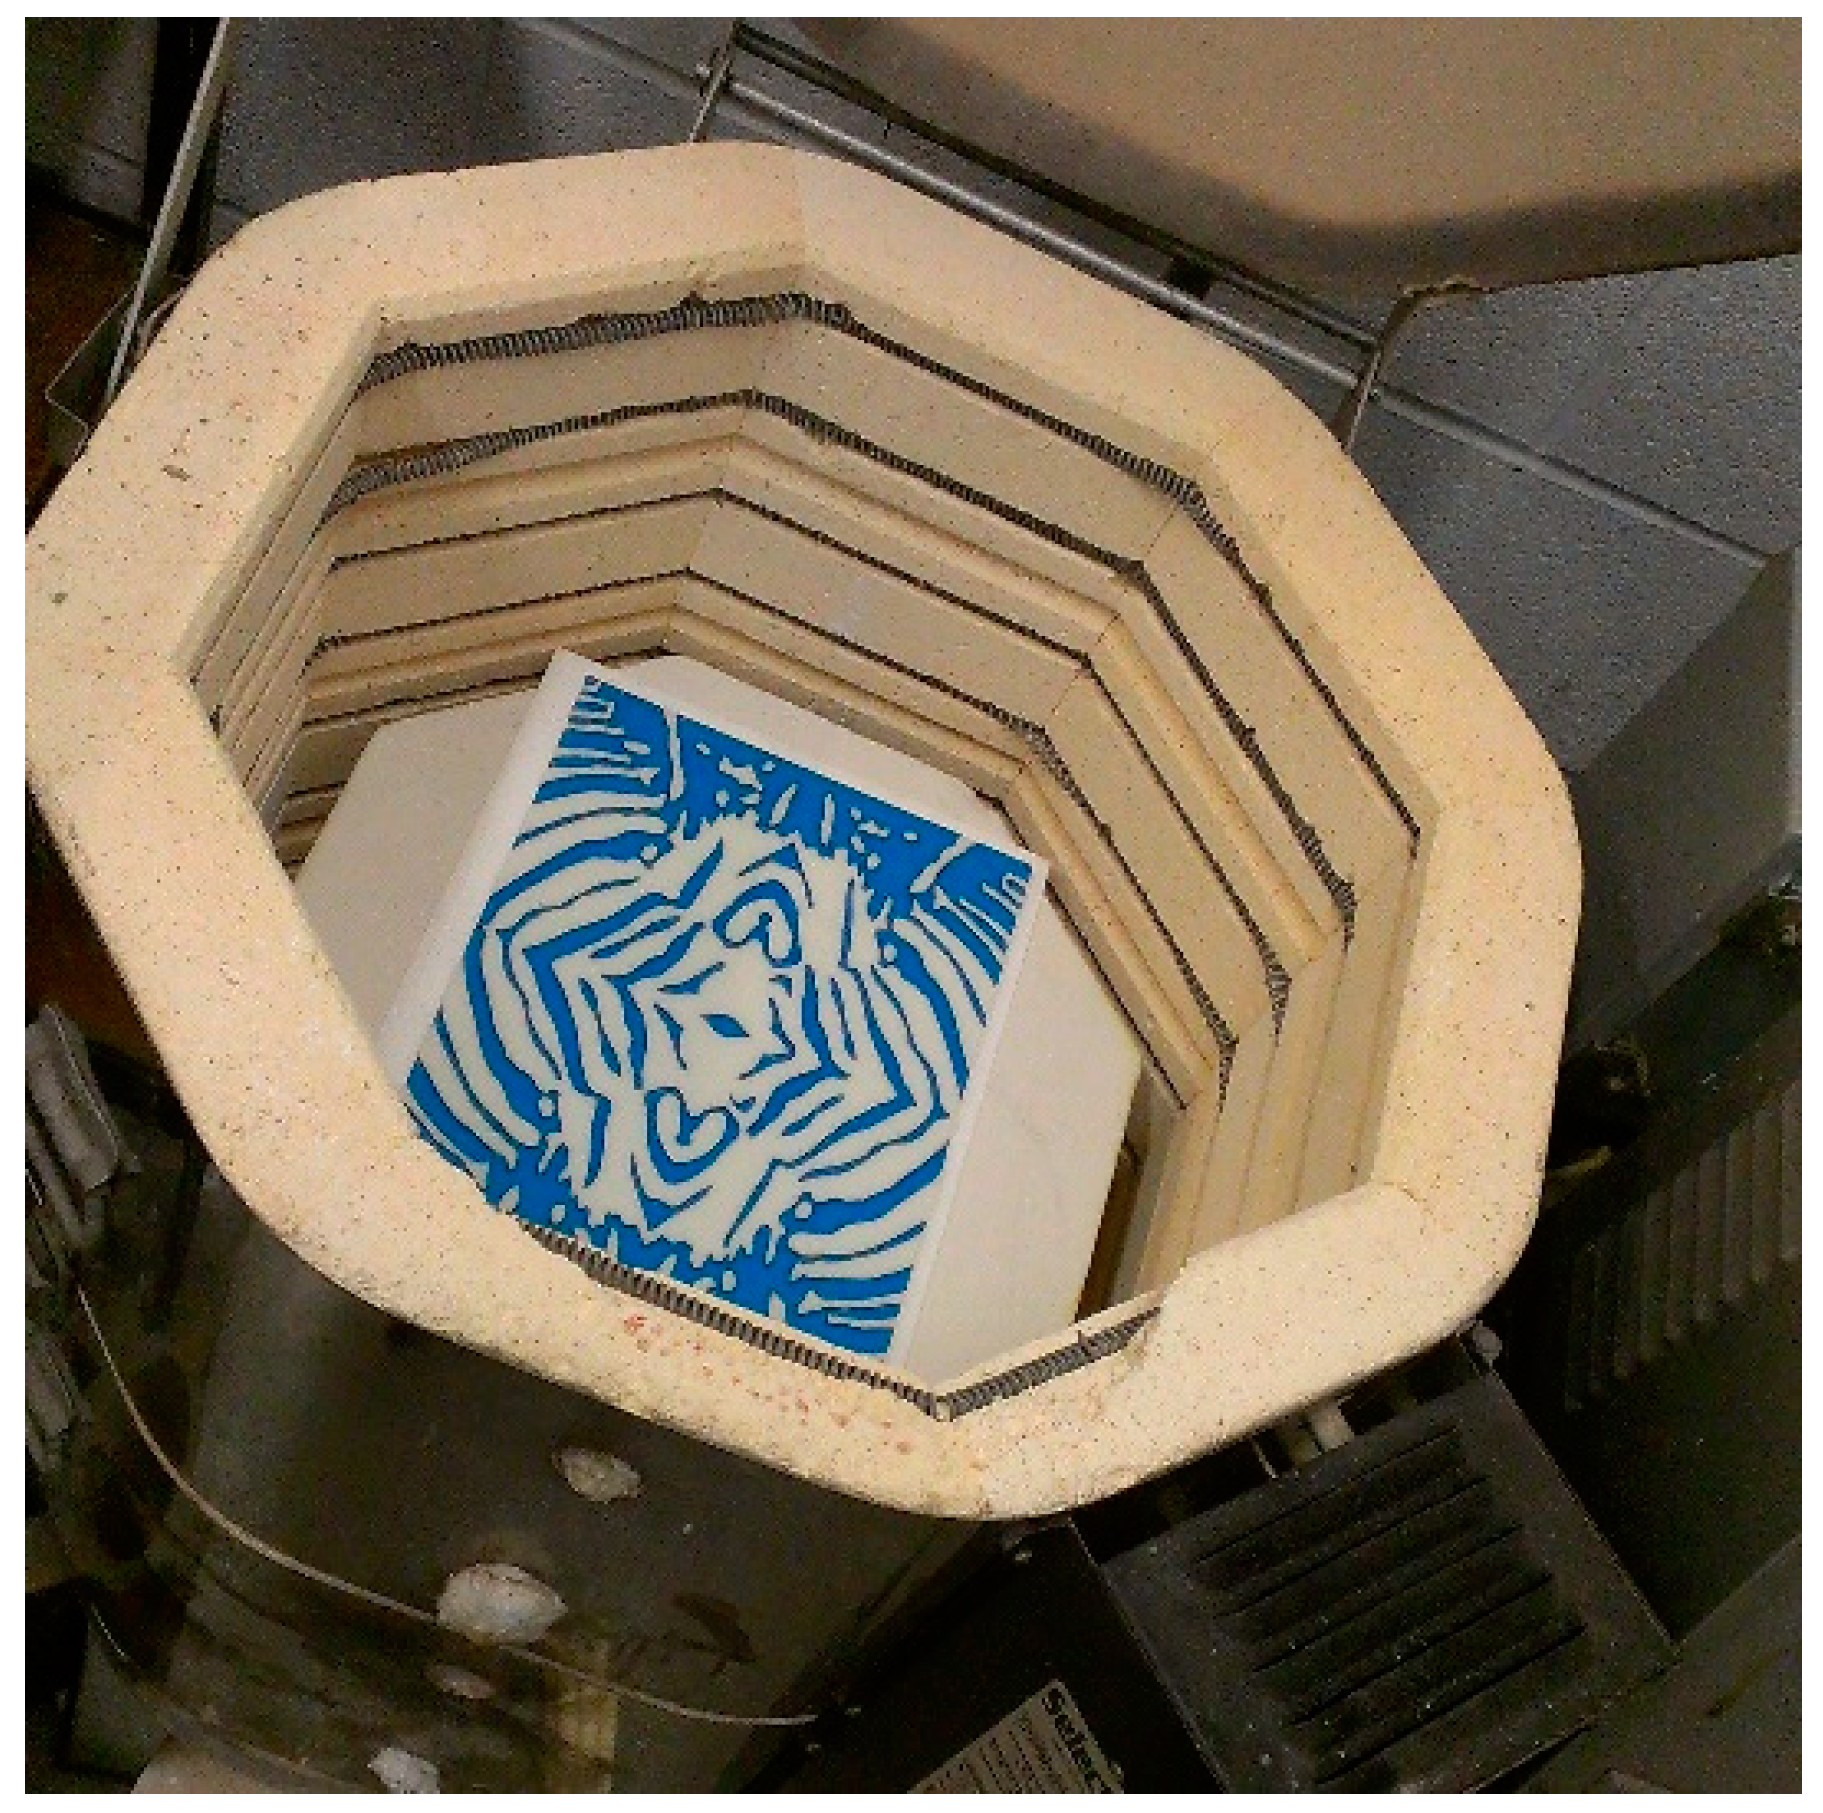
3.6. Step Six: Reassembling and Fusing the Parts
The parts are assembled onto a second full sheet of glass that will act as a base for the pattern (Figure 5). Once the pattern is complete it is carefully loaded onto a prepared kiln shelf and lowered into a glass-casting kiln. The pattern is then fired to 1375 °F until the top parts fuse together, typically 5–15 min. This will also fuse the assembled parts onto the underlying glass substrate, essentially creating a single sheet of glass. The sheet is then cooled to room temperature over roughly six hours.
3.7. Step Seven: Reheating for the Roll Up
After cooling the patterned sheet is cleaned of any kiln wash and flipped over so the pattern is face down. The entire sheet is then heated to 1000 °F at a maximum of 300 degrees per hour. At this temperature the glass will neither melt or crack but will simply hold until it can be heated further for the next step.
3.8. Step Eight: Preparing the Mold and Glass Bubble
Once the sheet reaches 1000 °F we can begin preparation of the bubble and mold. Prior to fusing the sheet glass a 5-part mold of a 4/5-scale model of my head was prepared so that a bubble of hot glass could be blown into it, capturing the general shape of my head and features. The mold was made of a simple plaster and wood glue mix, using 2 parts plaster to 1 part water (by weight) and an ounce of wood glue5 per pound of water. It was also designed so that the whole mold was contained within a wooden box, which hinged at the junction of each section (Figure 6). This hinging would allow me to easily remove the blown glass head from the mold. In order to prepare the mold for blowing it is coated with fresh graphite spray and misted with water. This will mitigate some of the erosive effects of hot glass on the surface of the mold.
The preparation of the bubble proceeds along typical glass blowing lines. Molten glass is “gathered” onto a blowpipe and partially inflated. It is then shaped into a cylinder with a circumference and length that will match the length of the fused sheet glass. Special care is taken to blow the bubble almost to the end of the glass but leave extra thickness on the sides. This is in preparation for the fact that the glass will expand a lot more toward the middle of the mold—the cranium and jaw areas—than it will on the crown of the head.
3.9. Step Nine: Heating and Softening of the Patterned Sheet Glass
Once the bubble is ready the sheet glass is raised to 1150 °F and held for at least ten minutes. This will ensure the interior of the sheet is at a high enough temperature to withstand the thermal shock of removing it to the open air, placing it on a “pastorali”, a long steel fork with a handle on the end. The entire sheet is then inserted into a reheating furnace that is running at roughly 2100 °F. It is kept in there for a time considered sufficient by the glassblower’s assistant and then removed and the kiln shelf rotated 180°. The pastorali is then reinserted into the reheating furnace and held for a suitable period. This process is repeated until the sheet of glass becomes soft enough to bend—which is tested by gently lifting one corner of the sheet.
3.10. Step Ten: Rolling Up the Sheet
Once the pattern is ready it is removed from the furnace and the prepared bubble is brought over and carefully placed onto one edge of the sheet. The fused sheet is then rolled around the relatively cool bubble until the edges meet. The surface is cleaned of kiln wash using a corn broom and the whole piece is reheated in the furnace. Care is given to seaming up the joint where the edges of the pattern meet (Figure 7). Once this is accomplished the piece is heated for blowing into the mold.
3.11. Step Eleven: Blowing into the Mold
Once the glass is sufficiently heated it is lowered into the mold, which is closed and latched. The bubble is slowly inflated until the blower can feel a resistance to the air pressure they are providing. Care must be taken never to release pressure as long as the bubble is in the mold. This is because the moisture in the mold is turning to steam and threatens to blow back into the form, creating inverted bubbles on the interior surface of the object. Once the glass has cooled sufficiently the mold is unhinged and the bubble removed. A constriction or “jack line” is then cut into the bubble near the end of the blowpipe. This will create a weak spot where the head will be broken free from the blowpipe so that work can continue on the sculpture.
3.12. Step Twelve: Transferring the Sculpture
Once the bubble has cooled sufficiently a “punti” is prepared. This is a solid steel rod that has fresh glass gathered onto one end. This hot glass is then pressed onto the surface of the sculpture, near the crown of the head, and a slight constriction cut into the glass between the head and the steel rod. A few drops of water are placed onto the jack-line of the bubble and with a quick tap of a metal tool it is broken free from the blowpipe. That end of the bubble is now open exposing the interior of the head.
3.13. Step Thirteen: Sculpting the Details
Once the head is transferred to the punti the sculpting begins. A torch is used to heat specific areas of the face (Figure 8) and custom-made tools are inserted through the opening and used to refine features like nose, ears and eyes. To carve detail into the surface different tools are used to push on the outside of the glass, defining creases like nostrils and lips. Of course, the entire sculpture must be kept at a minimum temperature—roughly 1100 °F—or it will crack. However, if it is heated too much gravity will cause it to deform, distorting the form taken from the mold. This means that the piece can only be kept out of the reheating furnace for short intervals, perhaps 20–30 s at a time. This means that the sculpting is done piece-meal, one area at a time. Also, if a specific area is heated too much the heat will spread to the nearby glass, exposing it to the possibility of distortion. In order to avoid this I must work the surface of the sculpture in a thoughtful manner, always being mindful of what I wish to move, and what I wish to remain. For example, I might heat the nose and push it out from the inside, but will move on to the ears or mouth before I push the nostrils in and define their outside curves. This gives the nose a chance to cool so that it will not distort when I heat the exterior and push the nostrils in. It is this heat management that is the real challenge in hot-sculpting glass.
3.14. Step Fourteen: Annealing the Sculpture
Once the piece is finished being sculpted it is time to remove it from the punti and put it away. Molten glass cannot simply be left out in the open air or it will shatter from thermal shock. Basically, glass expands a good deal when heated. If it cools too quickly the outside cools and shrinks quicker than the inside, resulting in cracking on the outside. As the piece continues to cool the cracks push into the core, shattering the piece.
To prevent thermal shock glass artists use a kiln to anneal glass. Annealing is the process of equalizing the temperature and then cooling the glass slowly enough that the interior and exterior shrink at the same rate. How long this takes depends entirely on the thickness of the glass. In the case of these mold-blown portraits, this takes about 12–15 h from 960 °F to room temperature.
3.15. Step Fifteen: Cold Working and Surface Treatment
Safety Note: The cold working of the glass holds greater hazards for the artist than hot-glass manipulation, although it is arguable that the extreme heat and flame involved in the latter are more daunting. However, as I often say to my students, it is difficult to burn yourself to death blowing glass. But, cold glass breaks, resulting in extremely sharp edges when it does. Students have been known to cut themselves, faint and the sight of blood and receive a concussion from a fall. Proper safety training and strict adherence to protocol are critical to safe manipulation of cold glass. Cold workers should never work alone and always wear appropriate safety gear when working with rotary tools—eye protection, hearing protection and respiratory protection, in addition to other manufacturer recommended safety protocols. When working with any hazardous material—such as the etching cream and silvering solution mentioned below—always follow the manufacturers recommendations for safe handling and use.
After the sculpture is cooled sufficiently we can begin the process of removing the punti-mark from the glass. This is done using a combination of diamond tools, including a tile saw and lathe. Small rotary diamond pads are used to refine the surface to match the rest of the sculpture. After the punti is removed the rest of the surface is addressed. Some portraits are treated with a mild acid6 that gently etches the surface, turning the glossiness to a satin finish. Others are sandblasted to create a softer look and still others are silvered inside with a commercially available silvering solution. Each treatment depends on how the portraits will be displayed for the viewer.
4. Summary
This project was a perfect example of the benefit of being exposed to digital technology and CAD-based output, and not only for the obvious timesaving advantages. If a student is not able to experience what it is like to generate work using digital technology, they will have difficulty folding those tools into their art-making practice. Practice-based research is not merely concerned with efficiency, expediency or even practicality. For the craftsperson, engaging with the medium (and gaining technical proficiency thereby) is an abiding goal of their research that exists alongside their conceptual interests. Sidestepping that work by adopting more efficient means—technological or otherwise—is not a motivation for many makers. However, digital technology can provide opportunities that can not only add tools to the glass artist, but these new tools can be combined in novel and unique ways that can generate new avenues of research. As far as I am aware, the creation of the work described in Section 4 above is the first time water-jet cut sheet glass has been combined with the other techniques described, some of which are millennia old7. Of course, I needed the manual skill and experience to produce the object in molten glass, but equally as essential was learning about the possibilities provided by water-jet technology. Combining these techniques solved my technical problem in a creative way and that series has generated new lines of inquiry that have made their way into my research and practice. Moreover, my practice now often utilizes digital technology in some part of the research process, whether generating digital mockups to visual a project, drawing patterns in a digital environment to be output via CNC machines, or as a way of roughing out patterns to reduce work-time.
There is a final consideration for those worried that digital technology will somehow seduce students away from training the hand, namely that a studio glass program is a great place to integrate CAD into art making precisely because the students are already being steeped in manual processes and skills. Art programs are already teaching the hand and those students are best suited to mitigate the often-recognizable signifiers of CNC machining: the resin lines, tool marks or sheer perfect geometry that belie the process. They are tomorrow’s artists who will invent ways to reintroduce the risk of the hand where needed and create new, as-yet-unimagined hybrid works that combine the digital and the handmade.
Funding
This research received no external funding.
Acknowledgments
The author would like to thanks Ken Carter and Ward Jet for their technical support and donation of time to enable the water-jet cutting described in Section 4. Thanks also to Mahwish Chishty and the Foundations Department at Kent State University for helping administer the surveys describe in Section 3. Final thanks to Katie Burkett for crunching the numbers and Jamie Hahn for her support and feedback.
Conflicts of Interest
The author declares no conflict of interest.
References
- Johnston, Lucy. 2015. Digital Handmade: Craftsmanship and the New Industrial Revolution. London: Thames & Hudson, pp. 8, 22. [Google Scholar]
- Luckner, Kurt T. 1994. Ancient glass. Art Institute of Chicago Museum Studies 20: 78–91. [Google Scholar] [CrossRef]
- NOAA. 2018. Available online: https://oceanservice.noaa.gov/facts/lionfish-facts.html (accessed on 28 January 2019).
- Shull, Jodie A. 2019. The computer and the chisel how digital innovations serve the artist A Visit with Sculptors Carole Feuerman and Barry X Ball. Sculpture Review 67: 24. [Google Scholar]
- The Seattle Times. 1992. Available online: http:// community.seattletimes.nwsource.com/archive/?date=19921027&slug=1521004 (accessed on 28 January 2019).
- Ward, W. R. Gerald. 2013. Review of Harvey K. Littleton: A Life in Glass: Founder of America’s Studio Glass Movement. West 86th: A Journal of Decorative Arts, Design History, and Material Culture 20: 130. [Google Scholar] [CrossRef]
- Wright, Diane C. 2011. New Glass at the Yale University Art Gallery. Yale University Art Gallery Bulletin, 26–33. Available online: http://www.jstor.org/stable/41421506 (accessed on 29 November 2018).
- Zax, David. 2007. The Nature of Glass. Smithsonian 38: 87. [Google Scholar]
| 1 | “Technology” is used here in a fairly standard sense. A simple definition would be something like “the practical application of scientific knowledge, particularly in a specific area”. |
| 2 | Barry X Ball is a sculptor whose work is a seamless blend of cutting edge digital process and traditional manual craftsmanship. Primarily working in stone, many of his sculptures begin with a 3D scan of existing historical stone masterpieces. The scans are then manipulated using 3D modeling software and flipped to produce a mirror image of the original sculptures before being rendered in various exotic stones, often types that cannot be carved by traditional means (Johnston 2015). Using CNC robots and mills, Ball roughs out the stone, which is then painstakingly finished using traditional stone carving techniques (Shull 2019). |
| 3 | Water jet machines run at incredible pressures, upwards of 60,000 p.s.i.. So, the most effective way of stopping the jet of water cutting through the floor below the nozzle is to use a large basin of water, roughly three feet deep (see Figure 3). The water slows the jet, protecting the floor and operator. However, everything above the water surface is cut through by the jet, that includes the material being cut, the substrate under that—often a piece of plywood or sheet metal—and the supportive grid below. In this case we used Styrofoam to support the glass to prevent any parts that did fall through from sinking into the basin. |
| 4 | The water jet uses a small amount of abrasive material that combines with the high-pressure water to cut through materials. In this case it was garnet sand, which left a pinkish residue along the edges of the glass. |
| 5 | The addition of yellow wood glue (aliphatic resin emulsion) is thought to strengthen and toughen the mold, increasing its lifespan. In my experience this is true, although I have no data on the differing strength characteristics between a plain plaster-water mix and one that contains wood glue. So far the evidence of an personal empirical nature, but glue seems to restrict mold degradation to surface spalling and flaking rather than large cracks or mold failures with plaster-water alone. I credit my BA glass professor, Arlon Bayliss. |
| 6 | Armor Etch® Cream: a mixture of Barium Sulfate, Sulfuric Acid, Sodium Biflouride and Ammonium Biflouride. The Manufacturer Safety Data Sheet (MSDS) can be found through the Household Products Database, maintained by the US Department of Health and Safety and listed online here: https://hpd.nlm.nih.gov/cgi-bin/household/brands?tbl=brands&id=1029001. |
| 7 | For example, the mold-blowing technique used to shape a bubble of molten glass first appears in archeological records from Roman excavations dating to the first century A.D. (Luckner 1994) On the other hand, the hot-sculpting method used to form the details into the bubble is a recent development made possible by the proliferation of portable oxy/propane torches that could be taken into the hot shop or furnace room and used to heat specific areas of the glass. This method of hot-sculpting was popularized in the early 1990’s by studio glass pioneer William Morris. |
Figure 1.
Portrait of the Artist: Invasive Redaction 17-05-13: Pterois volitans, Davin K. Ebanks. Water-jet cut, Mold-blown, Hot-sculpted and Silvered Glass, Aluminum, Wood. 18H × 20W × 10D inches. 2011. [Created by author].
Figure 1.
Portrait of the Artist: Invasive Redaction 17-05-13: Pterois volitans, Davin K. Ebanks. Water-jet cut, Mold-blown, Hot-sculpted and Silvered Glass, Aluminum, Wood. 18H × 20W × 10D inches. 2011. [Created by author].

Figure 2.
Vector-based graphic generated from lionfish pattern and composed in Adobe Illustrator. [Created by author].
Figure 2.
Vector-based graphic generated from lionfish pattern and composed in Adobe Illustrator. [Created by author].

Figure 3.
Ward Jet technician checking file. Notice the large basin of water under the nozzle. [Photo by Author].
Figure 3.
Ward Jet technician checking file. Notice the large basin of water under the nozzle. [Photo by Author].

Figure 4.
Water-jet cut glass parts, tabs and abrasive residue visible. [Created by author].

Figure 5.
Reassembled sheet glass pattern on single glass pane ready to fire and fuse. [Created by author].
Figure 5.
Reassembled sheet glass pattern on single glass pane ready to fire and fuse. [Created by author].

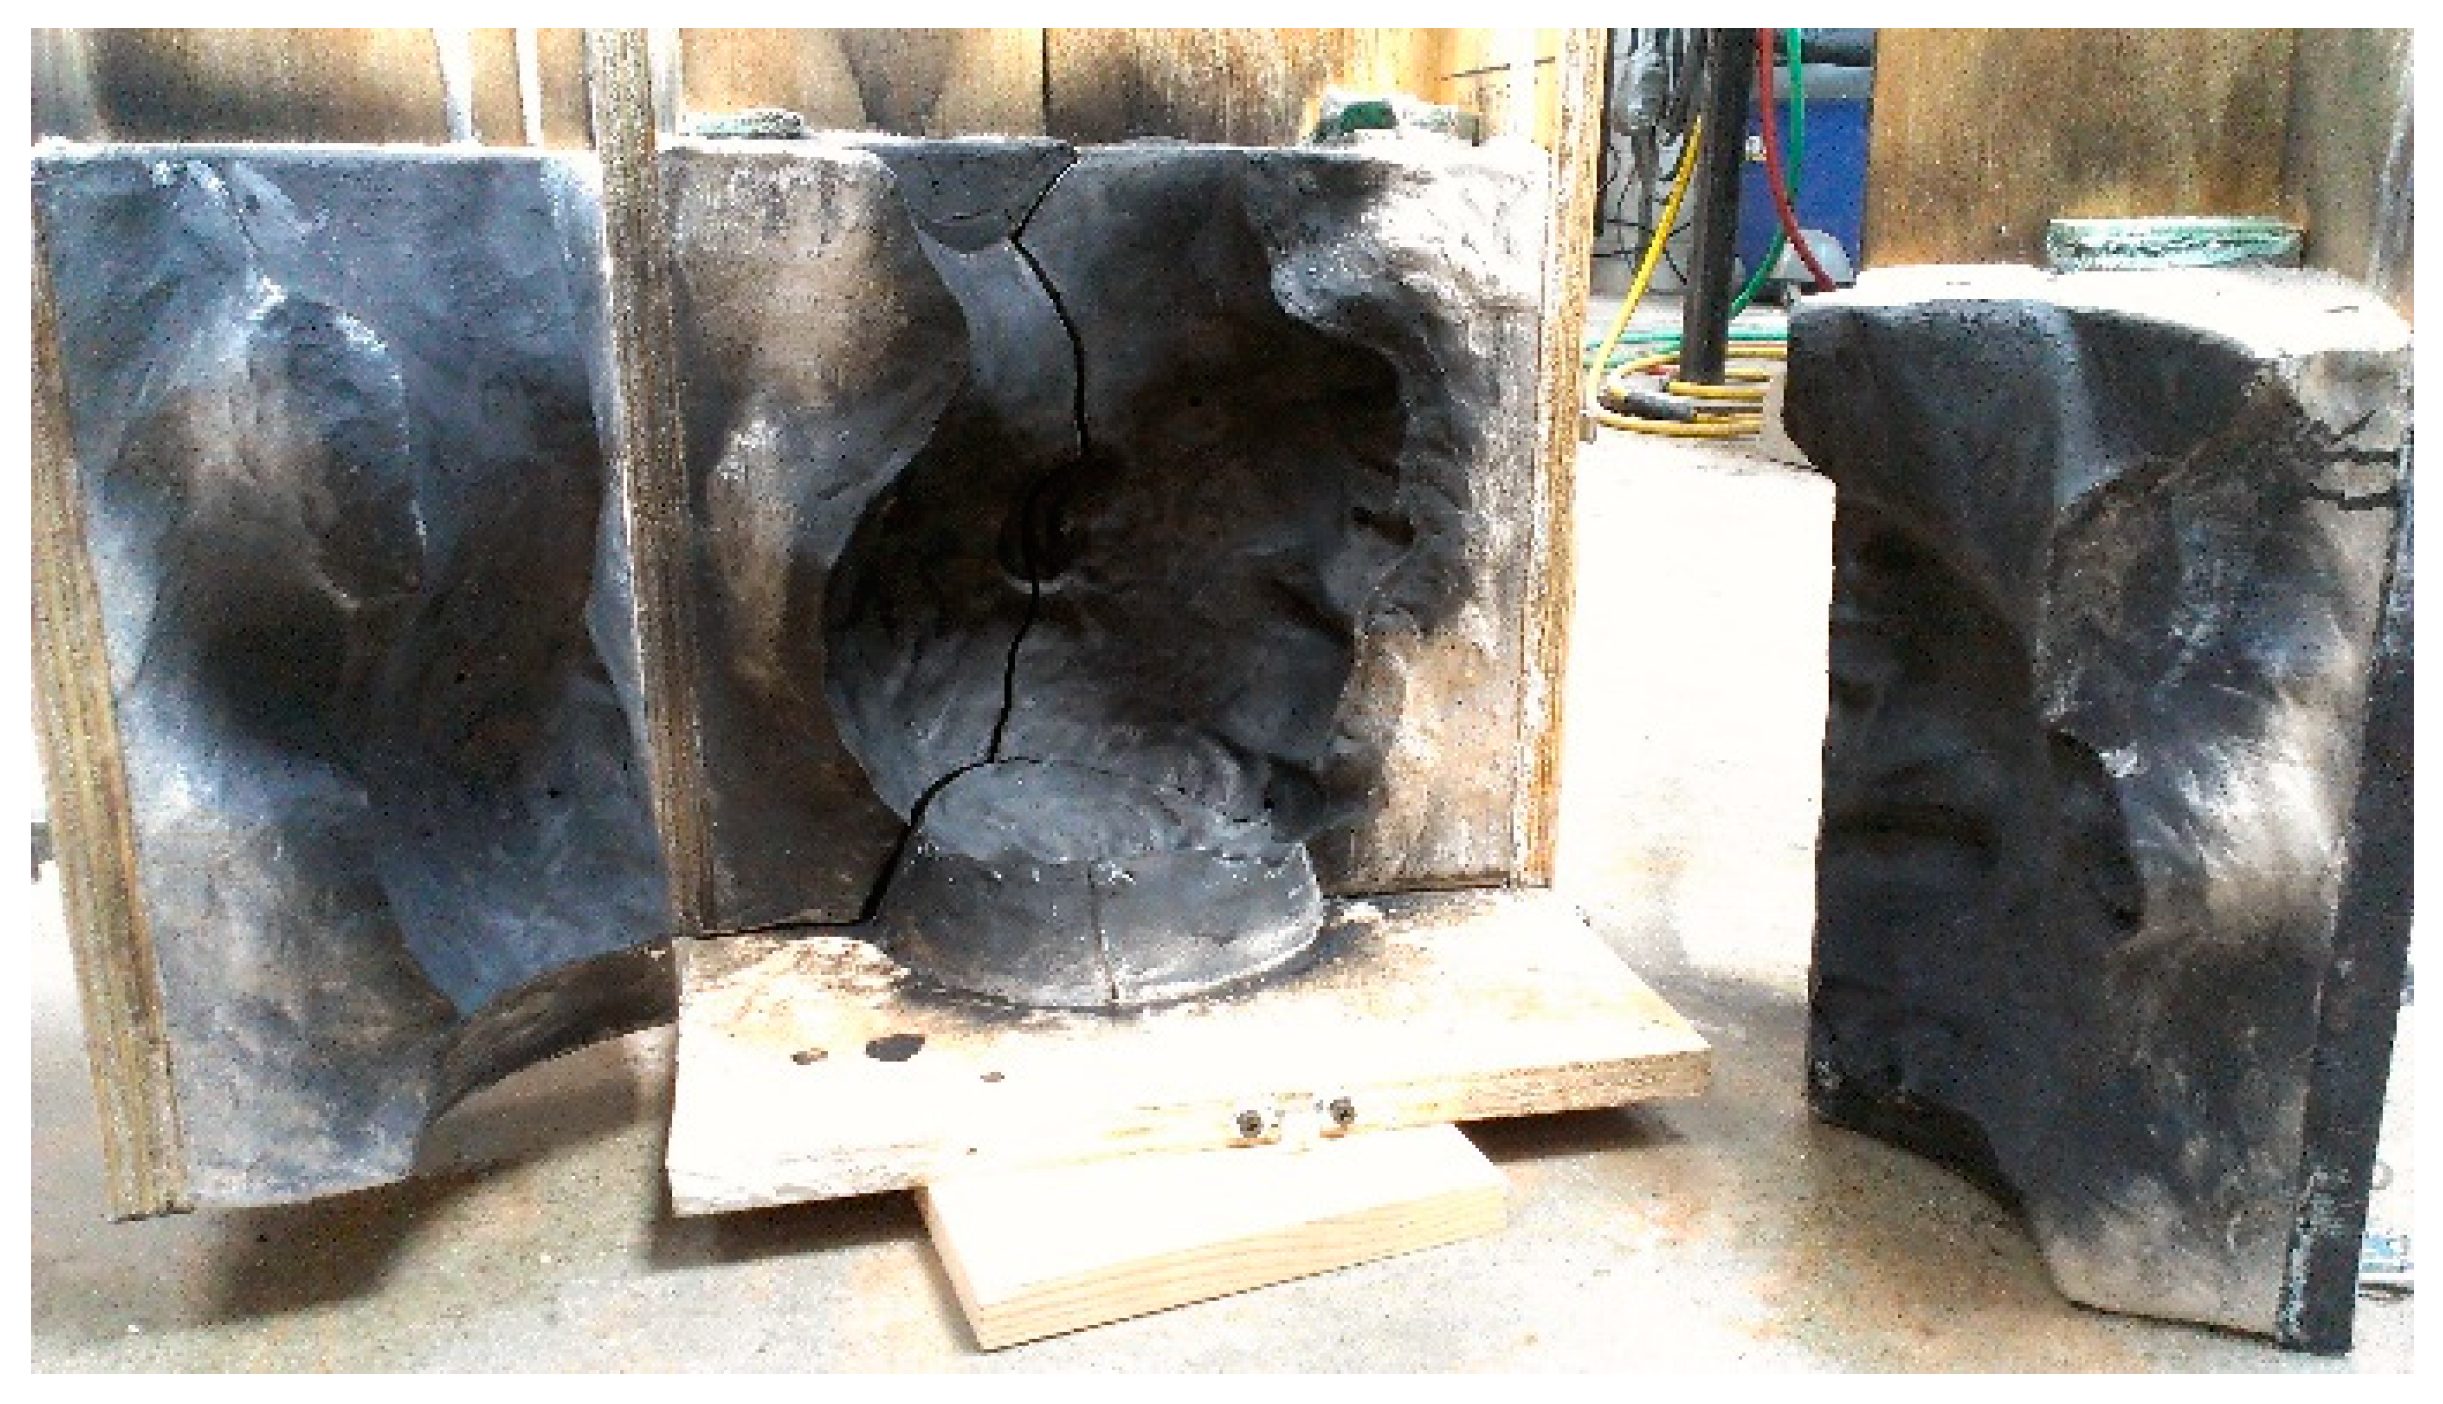
Figure 6.
Hinged, 5-part plaster blow mold coated with graphite in preparation for hot glass. [Created by author].
Figure 6.
Hinged, 5-part plaster blow mold coated with graphite in preparation for hot glass. [Created by author].

Figure 7.
Seaming up the edges of the fused pattern around a bubble. [Created by author].

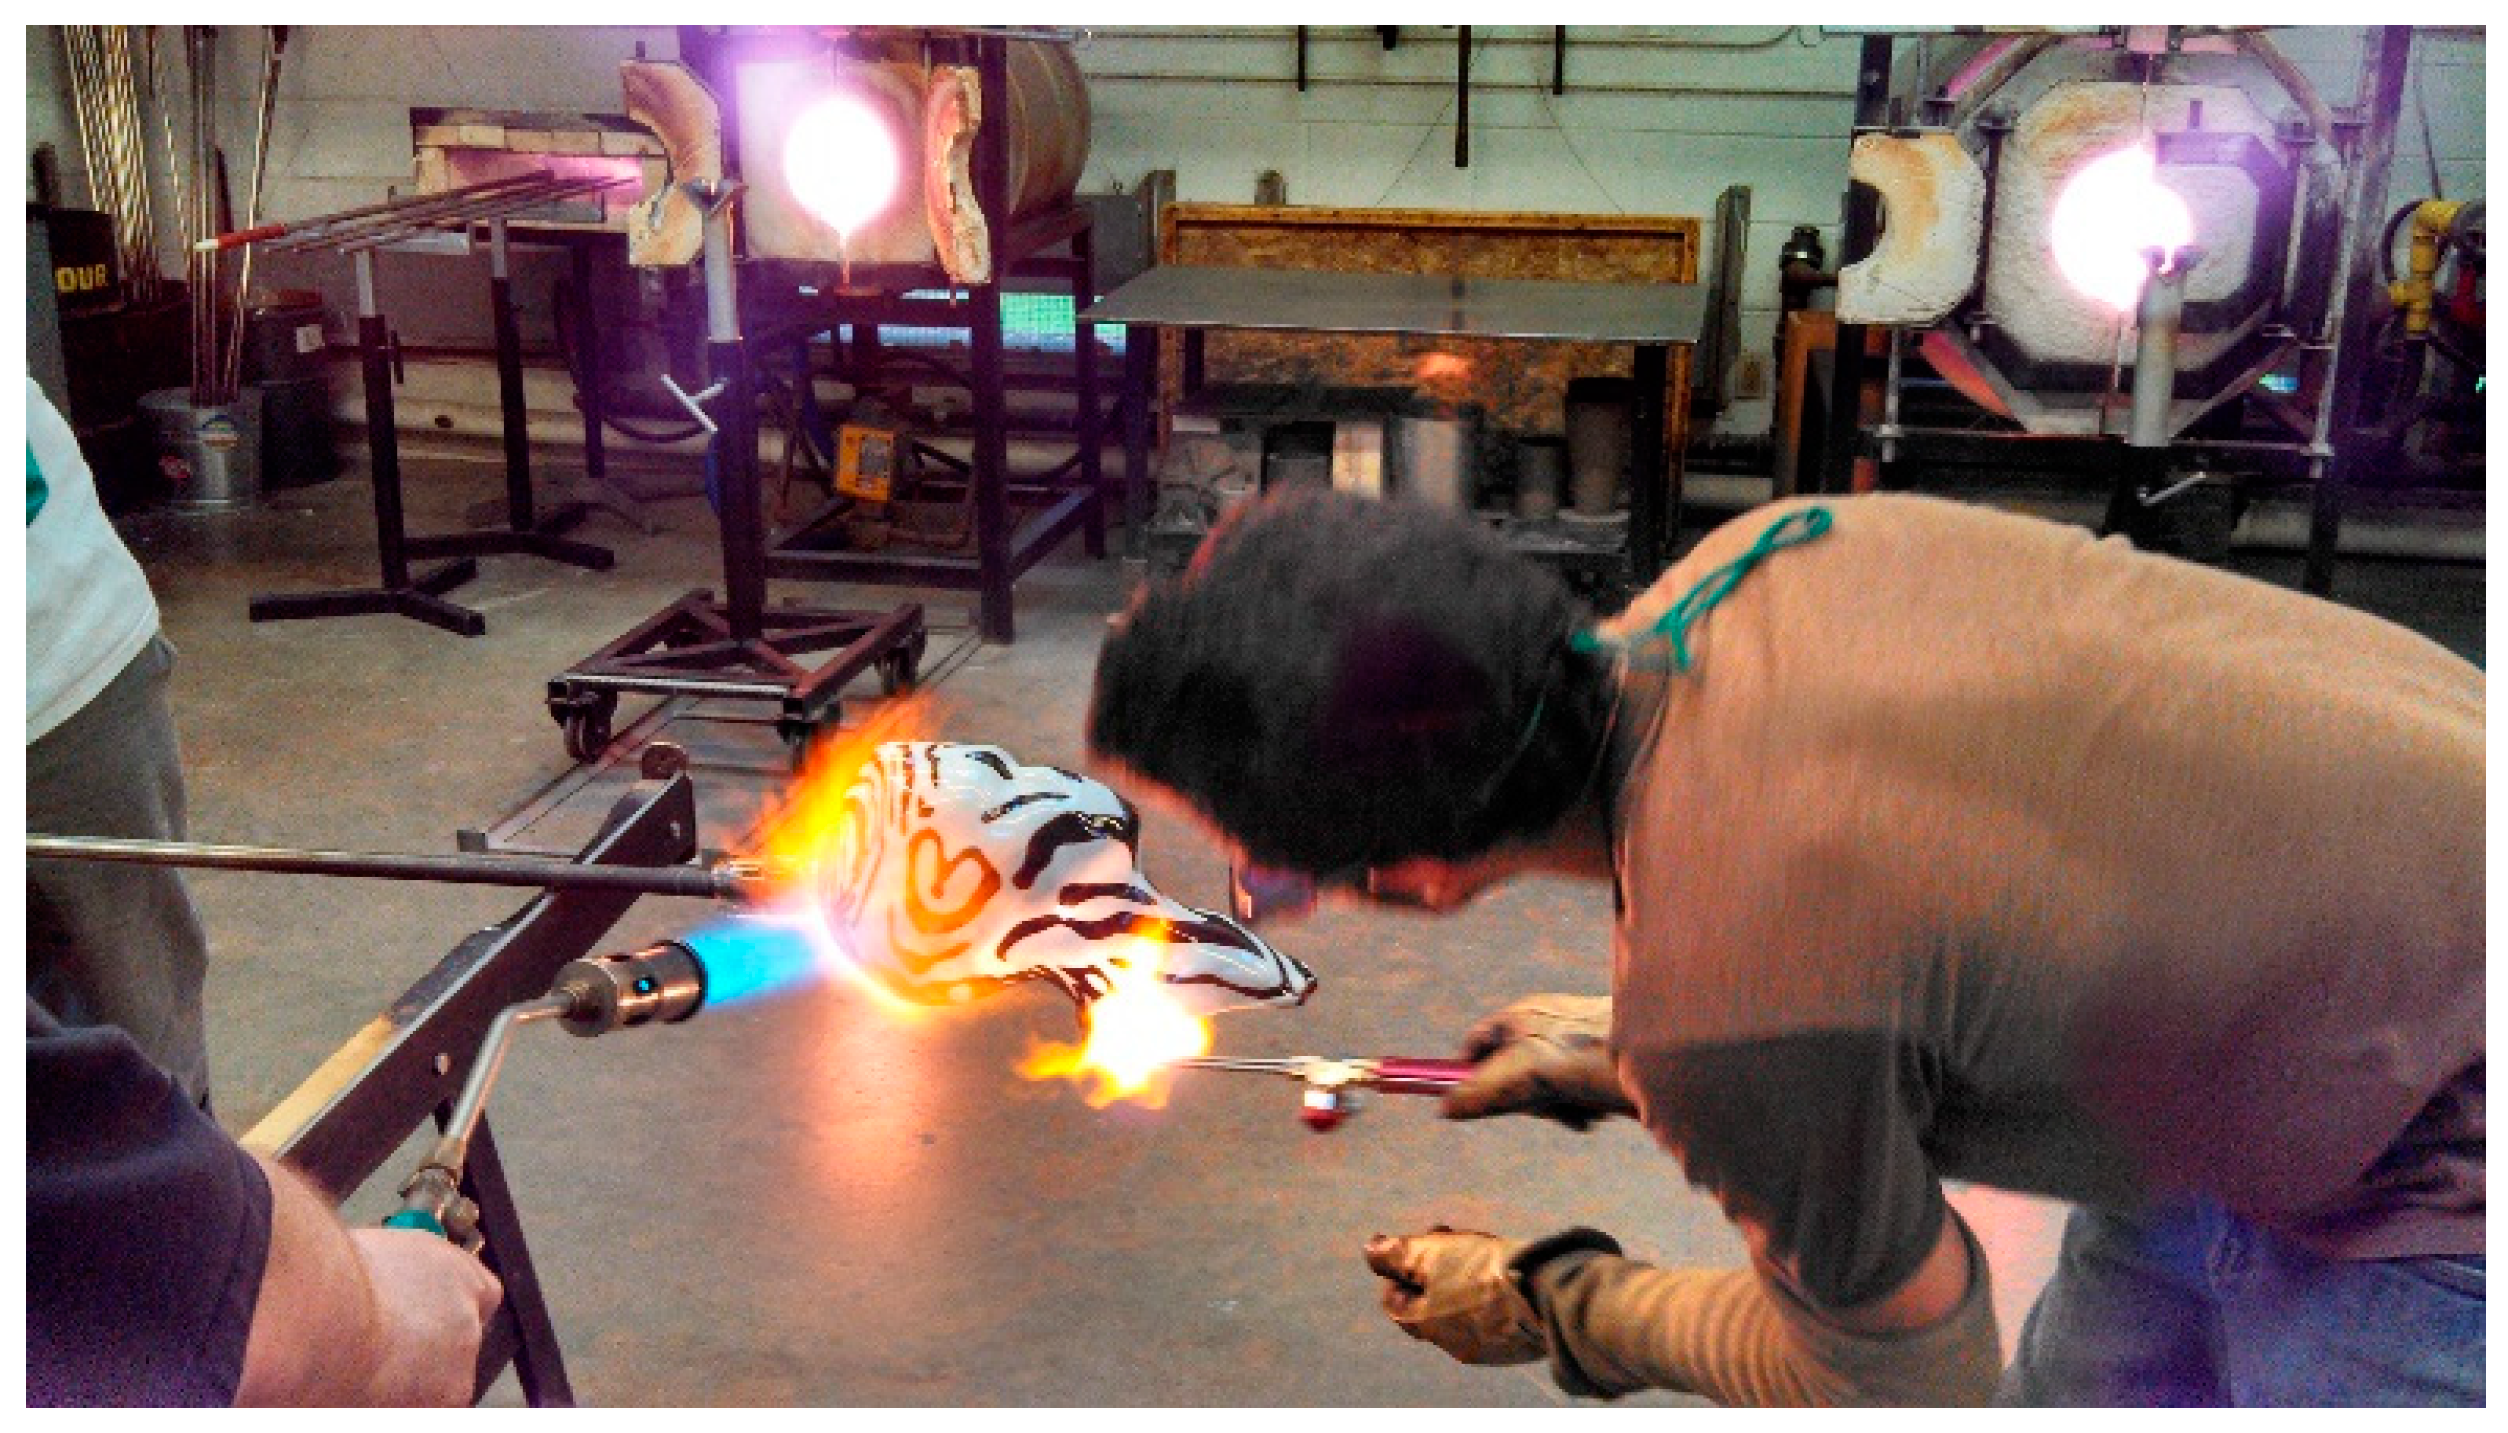
Figure 8.
Torching the bubble prior to sculpting details and features. [Created by author].

© 2019 by the author. Licensee MDPI, Basel, Switzerland. This article is an open access article distributed under the terms and conditions of the Creative Commons Attribution (CC BY) license (http://creativecommons.org/licenses/by/4.0/).
Share and Cite
MDPI and ACS Style
Ebanks, D.K. The Mediated Machine: Embracing Digital Technology as a Glass Artist and Student. Arts 2019, 8, 32. https://doi.org/10.3390/arts8010032
AMA Style
Ebanks DK. The Mediated Machine: Embracing Digital Technology as a Glass Artist and Student. Arts. 2019; 8(1):32. https://doi.org/10.3390/arts8010032
Chicago/Turabian StyleEbanks, Davin K. 2019. "The Mediated Machine: Embracing Digital Technology as a Glass Artist and Student" Arts 8, no. 1: 32. https://doi.org/10.3390/arts8010032
Note that from the first issue of 2016, this journal uses article numbers instead of page numbers. See further details here.