


When you have little kids at home, crafting with them can be a great way to get High Holiday ready. By talking about the different symbols and creating fun memories together through art, you can really start to get into the New Year spirit! Plus, all the great artwork is perfect for decorating the house (and later the Sukkah!) and can even serve as gifts or cards for family and friends to wish them a sweet New Year.
Below are a handful of great DIY options for creating special holiday décor that doesn’t take a lot of time but are fun hands-on activities to start talking about the excitement of the New Year. My kids love seeing their artwork hung up on the walls and we have even framed some of the artwork they have made for holidays to be displayed year-round. And for Sukkot, I love nothing more than hanging their artwork up to continue the sweet wishes and playful memories.
Hope you enjoy these crafts as much as we did. I’d love to see your finished products, so please tag @jewishphoenix in your photos or email them to us at info@jewishphoenix.com.
Happy crafting!
To download the stencils mentioned in the crafts below, please click HERE.
Buzzing with Joy
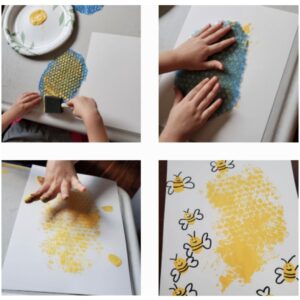
This craft took maybe 10 minutes to make, but I am obsessed with how cute it turned out. We definitely plan on framing them, and this would make the cutest handmade card for loved ones. I mean who doesn’t love fingerprint artwork?!
Materials needed:
- white or light colored paper, canvas or cardstock
- bubble wrap
- scissors
- yellow paint
- black sharpie or marker
Directions:
- Cut a piece of bubble wrap into a honeycomb shape. Lightly paint the textured side with yellow paint. Carefully place the bubble wrap, paint-side down, onto a piece of paper, canvas or cardstock. Press down lightly to transfer the design, but try not to move the bubble wrap too much or else you won’t get the effect of the honeycomb look. Dispose of the bubble wrap when done.
- Next, lightly paint or dip a thumb into the yellow paint and press down on the paper, canvas or cardstock, to create the body of the bee. Continue to create as many thumbprints as desired (note: these will later turn into the bees, so don’t place the thumbprints very close together).
- Once the paint has dried, use a black sharpie or marker to create the antennas, face, wings and body of the bee.
- Let dry completely and hang to display or write a message for a sweet new year!
Apple Magic
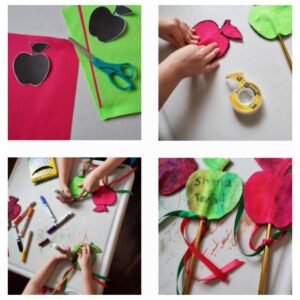
My kids love wands and we have probably a dozen between the dress up princess wands and the ones they’ve made on their own. So I thought an apple wand would be a perfect magical item to play with and wave over our home and each other to wish a magical and happy New Year. Since we made them, they have been waving them all over the house and haven’t stopped talking about the magic they are casting.
Materials needed:
- felt or cardstock
- apple stencil
- scissors
- double-sided tape or glue
- straws
- markers, stickers or other decorative materials
- ribbon
Directions:
- Trace two apples on your felt or cardstock and cut out the shapes. Place one of the apple cutouts down on the table and put the straw in the center to act as the handle of the wand.
- Using double-sided tape or glue, secure the straw to the first side. Then, carefully tape or glue the second apple cutout to the first being sure to line the shapes up.
- After the wand has been assembled, tie some ribbon around the straw to create a fun, whimsical effect.
- Once the wand is made, decorate the apples with markers, stickers or anything else you’d like. Wave your wands around to wish everyone a magical New Year!
New Year Stained Glass
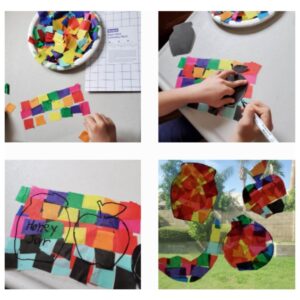
Stained glass is not only beautiful to look at, but really easy to make. My kids love playing with patterns and colors and love how they look hanging on our windows with the sun shining through. If you don’t want to hang these on your window, you can also use a whole puncher to create a hanging rainbow charm that is perfect to hang on bags or doorknobs.
Materials needed:
- laminating sheets
- colored tissue paper cut into squares
- holiday symbol stencils
- black sharpie or marker
- scissors
Directions:
- Cut a laminating sheet in half and peel the back. Place the non-sticky side down on the table and begin covering with colored tissue paper squares.
- Once the sheet is covered, peel the other half of the laminating sheet and carefully cover the tissue paper to fully laminate.
- Using a sharpie or marker, trace a desired shape on one side of the laminated artwork.
- Cut out the shape and hang on a window or glass door. If you’d prefer, use a whole puncher and ribbon to create a hanging charm instead.
Hidden Symbols
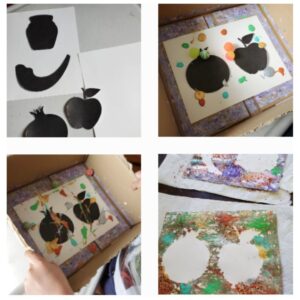
This project was probably my kids’ favorite since it involved paint and bouncy balls. They had fun shaking the box around to create patterns with the paint and were amazed at the final result once we took the taped symbols off and let the paint dry. I love how these turned out and can’t wait to display them in our home!
Materials needed:
- white or light colored paper or cardstock
- holiday symbol stencils
- tape
- large cardboard box
- paint in a variety of colors
- small bouncy balls
- glitter (optional)
Directions:
- Tape down one or two of holiday symbol stencils onto the piece of paper of cardstock. Tape the paper or cardstock onto the bottom of the cardboard box with the symbol side facing up.
- Squeeze a few drops of each color onto the paper that is inside the cardboard box. You need enough paint to cover the entire paper, but not too much so that the paper is soggy from the paint.
- Toss in the bouncy balls and begin tilting the box back and forth, up and down. The balls should begin spreading around the paint creating a beautiful effect.
- Once the shapes have been covered, carefully remove them to reveal the symbol. The paint should have created a fun boarder for the shapes. If desired, sprinkle on some glitter, and then set aside the artwork to dry before hanging or framing.
This post has been contributed by a third party. The opinions, facts and any media content are presented solely by the author, and JewishPhoenix assumes no responsibility for them. MORE


 - 2024-03-05T120322.751")


 - 2024-01-29T085229.300")


 - 2024-03-25T085519.472")


 (5)")


 (1)")
 (1)")


 - 2024-04-16T132329.807")

 (9)")


 - 2024-04-15T092022.719")
 - 2024-04-15T085938.177")


 - 2023-01-18T102702.116")

