Concept Planting in Revit using CS ArtisanRV
Create early phase Concept Planting for single plants (specimens or clumps), linear (hedges and avenues) or areas (woodlands and beds). Concept Planting provides quantifiable early phase content prior to creating Detailed Planting.
Create Concept Planting is available from the Planting panel.

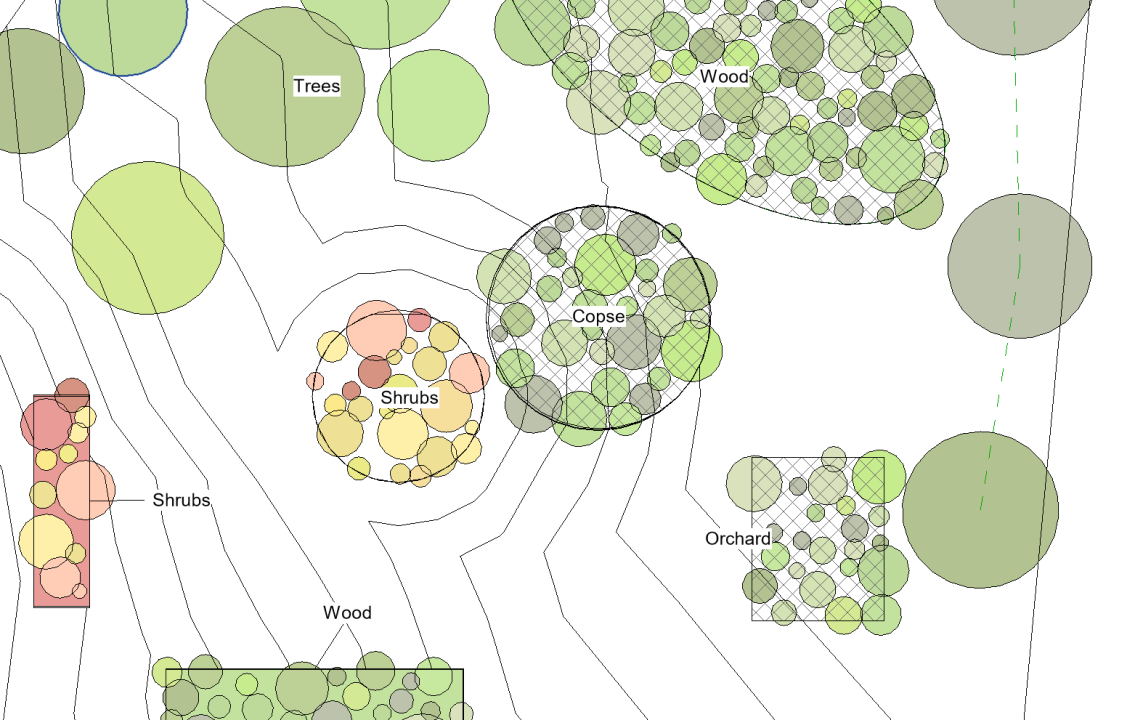
To create early phase Concept Planting for single plants (specimens or clumps), linear (hedges and avenues) or Areas (woodlands and beds). Concept Planting provides a quick process for setting down initial arrangements of different planting types using a dynamic graphic representation that reflects general design intent. Concept Planting provides quantifiable early phase content prior to creating Detailed Planting and is very easy to modify or edit.
Concept Planting provides a quick graphical representation and accurate record of underlying information. Graphical imagery is provided as simple vegetation symboly filled in a range of colours from Shade options and in randomised sizes. Colour ranges and hues are provided via Shade and Alpha Brightness.
Optional data fields enable associated records to be sorted, grouped or filtered in schedules and to define design intent and levels of detail appropriate for required project phases.
- Location
- Description
- Notes
Concept Planting instances can be tagged.
Concept Planting is placed as singular, linear and area types.
Concept Area Planting
Concept Area Planting - Create planting into a defined area, topo, floor or region.
Command: Area Planting is available from Create Concept Planting dialog.

Area Concept Planting dynamically places planting symbology into a defined area, topo, floor or region and provides an accurate schedule record.
Usage
Concept Planting provides a quick graphical representation and accurate record of underlying information applied to an area, topo, floor or region.
Graphical symbology is applied based on the selected Shade and Alpha settings and either Auto-Sized to fit the selected area (recommended) or using manually defined Maximum and Minimum Diameter and Density.
Define optional Location, Description and Notes areas if/as required [note this information can be added subsequently using Edit Concept Planting].
Select Shade and Alpha Brightness settings as required.
Sizing and Centres
Graphical symbology is Auto-Sized by default to fit the selected area with a density automatically calculated to fi8t the selected area. Alternatively users can manually define Maximum and Minimum Diameter and Density.
Centres
Centres values are used soley to calculate planting numbers in a schedule for inital quantification and budget estimation.

Place
Pick Place and select areas, topos, floors or regions as required.

Concept Linear Planting
Linear Planting - Place hedge and avenue planting.
Command: Linear Planting is available from Create Concept Planting dialog.

Purpose
Linear Concept Planting dynamically places planting symbology along a defined model or design line and provides an associated schedule record.
Usage
Concept Planting provides a quick graphical representation and accurate record of underlying information applied to a model line or design line.
Graphical symbology is applied based on the selected Shade and Alpha settings and either Auto-Sized to fit the selected area (recommended) or using manually defined Maximum and Minimum Diameter and Density.
Define optional Location, Description and Notes areas if/as required [note this information can be added subsequently using Edit Concept Planting].
Select Shade and Alpha Brightness settings as required.
Type
Linear Concept Planting offers a number of options via the Type drop-down menu.
- Native Hedge
- Ornamental Hedge
- Avenue Planting
Width
Defines the size of the hedge used to determine the massing of symbols.
Row No
Defines the intended number of rows for hedge planting. Note that this parameter is not used to change linear symbology.

Centres values
Centres are used soley to calculate planting numbers in a schedule for inital quantification and budget estimation.
Place
Pick Place and select lines as required.

Concept Planting Singular
Singular Planting - Place single plants or clumps.
Command: Singular Planting is available from Create Concept Planting dialog.

Purpose
Singular Concept Planting places planting symbology into a model provides and creates an automatic count record for scheduling.
Usage
Graphical symbology is applied based on the selected Shade and Alpha settings and the manual Diameter value defined.
Define optional Location, Description and Notes areas if/as required [note this information can be added subsequently using Edit Concept Planting].
Select Shade and Alpha Brightness settings as required.
Type
Singular Concept Planting offers a couple of options via the Type drop-down menu.
Single creates an individual plant placement that is sized based on the defined Diameter value.

Clump creates a close group of 3 single plant symbols sized based on the defined Diameter value.Note that schedule records will show singular planting instances (i.e. 3 single plants per Clump).

Diameter
Graphical symbology for singlular planting is sized by the value in the Diameter.
Place
Pick Place and locate single plants and clumps as required.

Concept Planting Schedules
Command
Import Planting Schedules is available from the Other Utilities panel.

Purpose
To load pre-defined planting schedules into the current model.
ArtisanRV default planting schedules are available as Full Planting Schedule - Planting Schedule by Location - Planting Schedule by Mix and Class - Concept Planting Schedule
From the Schedules/Quantities area in the Project Browser, select Artisan - Concept Planting Schedule.

Edit Concept Planting
Command
Edit Planting is available from the Planting panel. The intelligent Edit Planting command supports both Concept Planting and Detail Planting .

For Concept Planting, Editing is delivered via the single dynamic button that automatically detects whether users are selecting Area, Linear or Singular planting and loads the associated dialog. The Split Area Planting tool is available for both Concept Planting and Detailed Planting.
Options to enable multiple single items to be selected, to drop connections on singular planting and to convert linear planting to singular are appricable only to Detailed Planting .
From the Edit Planting utility, users can add or change Location, Description, Shade, Alpha, Notes, Graphic Sizing, Density, Type (Linear and Singular Planting).
Split Area Planting
The Split Area Planting tool enables regions, topos and floors to which Area Planting has been applied, to be divided into two separate sub areas. Users are then able to substitute either or both of the new split areas. The Split Area Planting tool supports both Concept and Detailed Planting and may be of particular benefit as a more detail is provided to general arrangments created during early phase work.
Select Split Area Planting from the Edit Planting pop-down menu.

Split Area Planting is used to create two areas from a single one where planting has been placed.

Use model line to split the area planting in two.

Select Split Area Planting from the Edit Planting pop-down menu and select the bounding region, topo or floor and then pick the split line. Two planting areas are created and can be tagged separately. Note that there may be minor rounding of totals based on planting quantity calculations.

Edit Planting to change or substitute either or both area as required.

Edit Planting to change Tag Options as required.
Tim Calnan, Director, CloudScapes
CloudScapes Design Limited (CSD) produce powerful landscape design solutions based on Revit, AutoCAD and BricsCAD technology. The suite of web-integrated software has been designed and supported by landscape experts over the last three decades and is regarded by landscape architects, garden designers and design professionals across the UK and internationally as including the must-have design tools for any landscape toolbox.