There has been tremendous growth in AI over the years. With that, comes a larger demand for AI models and applications. Creating production-quality AI requires expertise in AI and data science and can still be intimidating for many developers.
To develop accurate AI, you must choose what model architecture to use, what data to collect, and finally how to tune the model to meet the desired KPIs. There are thousands of combinations of model architectures and hyperparameters that you’d have to try to get the best model for your specific use case. This process is extremely laborious and requires model architecture expertise to tune hyperparameters.
Automated machine learning (AutoML) automates the manual task of finding the best models and hyperparameters for the desired KPI. It can algorithmically derive the best model for your given KPI and abstract away a lot of the complexity of AI model creation and optimization.
AutoML makes it easy for even a novice developer to create a highly accurate AI model.
AutoML in TAO
AutoML in TAO is fully configurable for automatically optimizing the hyperparameters of a model, which reduces the need for manual tuning. It caters to both AI experts and non-experts.
- For non-experts, the guided Jupyter notebook provides a simple, efficient way to create an accurate AI model.
- For experts, TAO gives you full control of which hyperparameters to tune and which algorithm to use for sweeps.
TAO currently supports two optimization algorithms: Baysian and Hyperband optimization. These algorithms can effectively sweep across a range of hyperparameters to find the best combination to optimize the user-provided metric.
Hyperband yields faster because it doesn’t have to run through the entire training configuration. It runs for a limited number of epochs, discards the runs that are performing poorly, and only continues on the remaining runs. This process of elimination continues until there is a single configuration that gives the best results.
For Bayesian, the training runs to completion for all the sweeps.
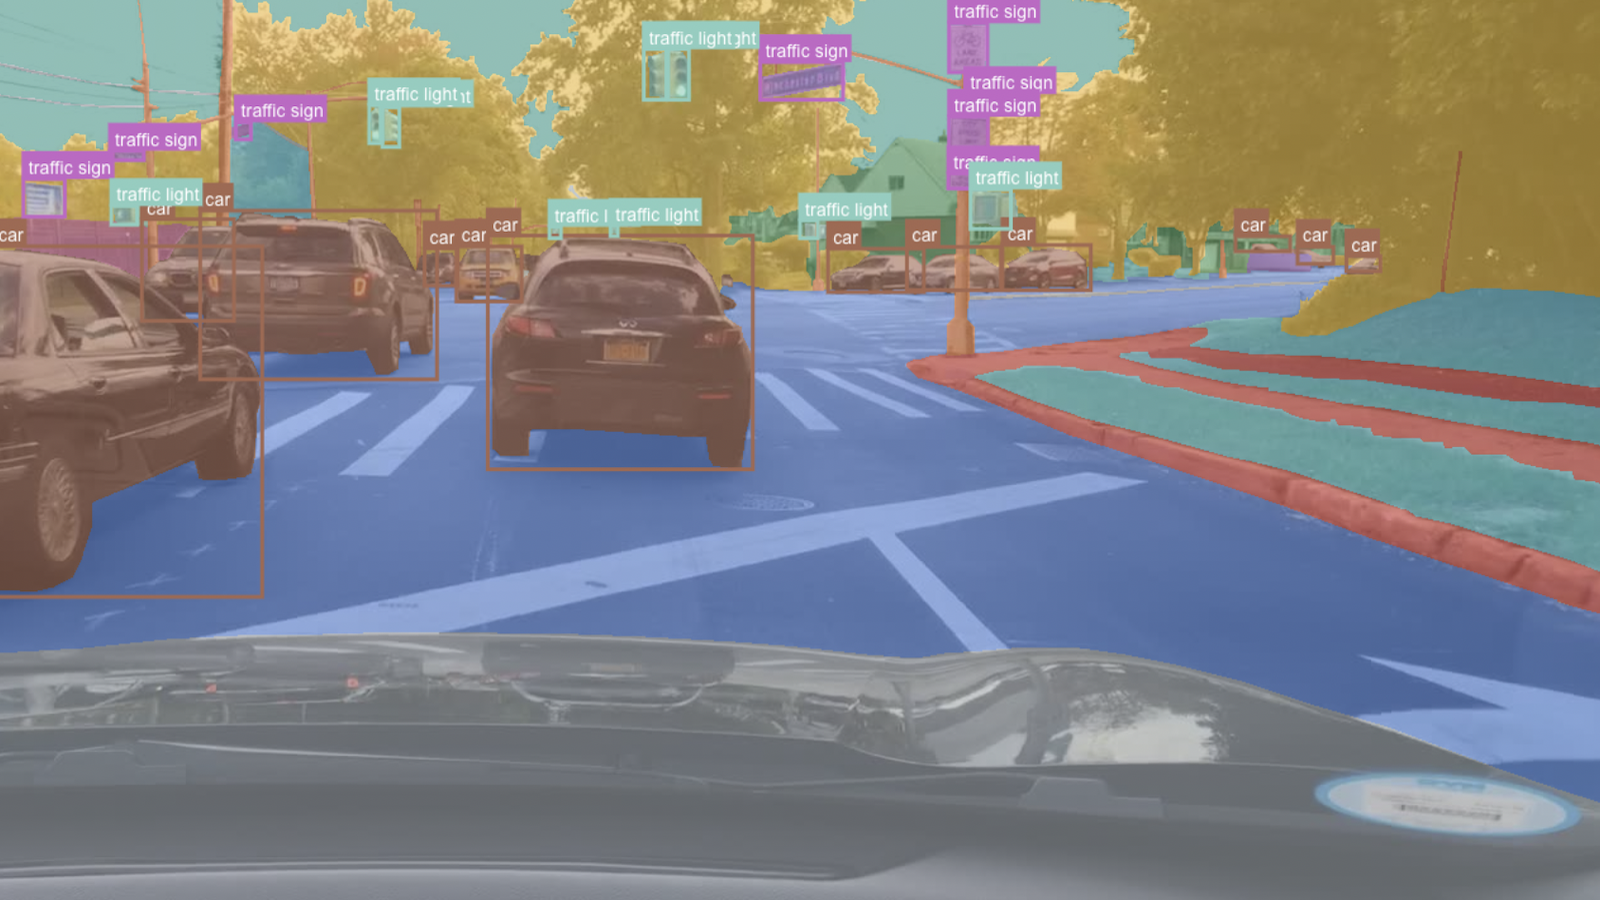
AutoML is supported for a wide range of CV tasks: image classification, object detection, segmentation, and OCR. Table 1 shows the full list of supported networks.
| Image Classification | Object Detection | Segmentation | OCR |
| ResNet10/18/34/50/101 EfficientNet_B0-B7 DarkNet19/53 CSPDarkNet19/53/Tiny MobileNet_v1/v2 SqueezeNet VGG16/19 GoogleNet | YoloV3/V4/V4-Tiny EfficientNet RetinaNet FasterRCNN DetectNet_v2 SSD/DSSD | UNET MaskRCNN | LPRNet |
Getting started with AutoML
The entire AutoML workflow can be run from the provided Jupyter notebooks. AutoML uses the TAO API services to manage all training jobs.
TAO API services
TAO API is a Kubernetes service that enables deployment of TAO as a microservice either on your own Kubernetes cluster or with cloud Kubernetes services such as Amazon EKS or Azure AKS.
TAO API services provide an additional layer of abstraction over containers. You can manage and deploy TAO services using Helm charts and remotely run jobs using REST API calls. With the APIs, you can remotely create and upload datasets, run training jobs, evaluate models, and export models for deployment.
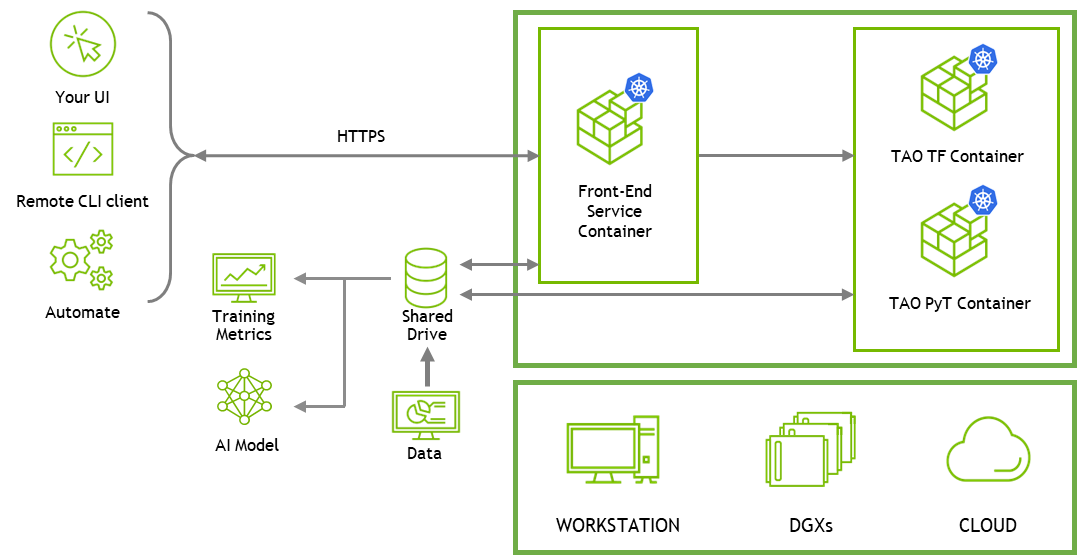
API services make it easy to integrate TAO into your own custom application or build a web-UI application on top of TAO. To get started with building your custom applications with REST APIs, see the API guide and the API notebooks in TAO Toolkit Getting Started. For more information, see the Notebook section later in this post.
To train using the CLI, use the lightweight CLI client application that you can install on a client system to access TAO services and CLI notebooks. CLI notebooks are available on NGC in TAO getting started resources.
AutoML requires a higher-level service on top of your training runs to determine and manage the set of experiments. TAO services keep track of all the experiments that they have tried with the KPIs and build the next set of experiments to improve on the KPIs. You can run AutoML with TAO API services either through the remote CLI application or directly using REST APIs. Jupyter notebooks for both are provided. For more information, see the Notebook section.
The REST API notebooks mainly serve as a reference if you are building your own applications or UI on top of TAO.
Set up TAO services
The TAO API service can run on any Kubernetes platform. To simplify the deployment of TAO services, we have provided a one-click deploy script. This simplifies the deployment of TAO services on bare-metal setup or on Amazon EKS. For this post, we use the bare-metal setup but instructions to deploy on the cloud are provided in the API guide.
Prerequisites
- An NVIDIA GPU (on-premises or in the cloud):
- NVIDIA Volta architecture
- NVIDIA Turing architecture
- NVIDIA Ampere architecture
- NVIDIA Hopper architecture
- TAO Toolkit 4.0
- Ubuntu 18.04 or 20.04
Download the one-click deploy folder using the NGC CLI:
ngc registry resource download-version "nvidia/tao/tao-getting-started:4.0.0"
Change the current directory:
cd tao-getting-started_v4.0.0/cv/resource/setup/quickstart_api_bare_metal
Add the host IP address and login credentials in the hosts file. This is the system where you plan to run the TAO services. It could be a local or remote system but you must have sudo privileges.
For credentials, you can use either a password (ansible_ssh_pass) or an SSH private key file (ansible_ssh_private_key_file). For a single-node cluster, you can list only the master node.
File name: hosts:

[master]
<IP Address> ansible_ssh_user='<username>' ansible_ssh_pass='<password>'
[nodes]
<IP Address> ansible_ssh_user='<username>' ansible_ssh_pass='<password>'
You can validate SSH credentials for remote machines with the following command. The proper answer would be root.
ssh <username>@<IP Address> 'sudo whoami'
Next, modify the tao-toolkit-api-ansible-values.yml file to add your NGC credentials and the Helm chart. This pulls the Helm chart from the NGC registry. For more information, see Generating Your NGC API Key.
File name: tao-toolkit-api-ansible-values.yml

ngc_api_key: <NGC API Key>
ngc_email: <NGC email>
api_chart: https://helm.ngc.nvidia.com/nvidia/tao/charts/tao-toolkit-api-4.0.0.tgz
api_values: ./tao-toolkit-api-helm-values.yml
cluster_name: tao-automl-demo
Install the dependencies and deploy the TAO service. Before installation, first check whether all the dependencies are met by running check-inventory.yml. If everything looks good, you should see a message that says 0 failed. Then, run install, which takes 10–15 minutes.
bash setup.sh check-inventory.yml
bash setup.sh install
Download AutoML notebooks
Download the computer vision training resources from TAO Toolkit Getting Started on NGC.
wget --content-disposition
https://api.ngc.nvidia.com/v2/resources/nvidia/tao/getting_started/versions/4.0.0/zip -O getting_started_v4.0.0.zip
unzip -u getting_started_v4.0.0.zip  -d ./getting_started_v4.0.0 &&
rm -rf getting_started_v4.0.0.zip && cd ./getting_started_v4.0.0
All the AutoML-related notebooks are inside the TAO API directory. The notebooks are provided in the directory structure:
notebooks
     |--> tao_api_starter_kit
          |--> API
               |--> automl
               |--> end2end
               |--> dataset_prepare
          |--> client
               |--> automl
                    |--> classification.ipynb
                    |--> object_detection.ipynb
                    |--> segmentation.ipynb
                    |--> lprnet.ipynb
               |--> end2end
               |--> dataset_prepare
For this post, use the object detection notebook (TAO API Starter Kit/Notebooks/client/automl/object_detection.ipynb) but you can also do AutoML on other computer vision tasks.
Use AutoML to fine-tune an object detection model with TAO
Here is a quick walkthrough of the AutoML workflow with the Object Detection AutoML notebook. For this walkthrough, you use the client/automl/object_detection.ipynb notebook from the hierarchy shown earlier. We highlight the key steps here, but all the steps are captured in the Jupyter notebook.

Select a model topology
Choose any one of the available models listed for that notebook. Each notebook has a default model for that domain. In this example, the default model is DetectNet V2 but you can change it to FasterRCNN, SSD, DSSD, Retinanet, EfficientDet, Yolo V3, Yolo V4, or YoloV4 tiny.
model_name = "detectnet-v2"
Create a dataset
The next step is to use the dataset given as an example in the notebook or use your own dataset. The folder structure of the dataset requirement is provided in the notebooks.
train_dataset_id = subprocess.getoutput(f"tao-client {model_name} dataset-create --dataset_type object_detection --dataset_format {ds_format}")
print(train_dataset_id)

eval_dataset_id = subprocess.getoutput(f"tao-client {model_name} dataset-create --dataset_type object_detection --dataset_format {ds_format}")
print(eval_dataset_id)
Upload the dataset
When you have the dataset ready, upload it to the TAO Toolkit REST API-deployed machine through the Unix rsync command for TAO-Client notebooks. You must upload the images and labels for both training and validation data.
rsync -ah --info=progress2 {TRAIN_DATA_DIR}/images ~/shared/users/{os.environ['USER']}/datasets/{train_dataset_id}/
rsync -ah --info=progress2 {TRAIN_DATA_DIR}/labels ~/shared/users/{os.environ['USER']}/datasets/{train_dataset_id}/
rsync -ah --info=progress2 {VAL_DATA_DIR}/images ~/shared/users/{os.environ['USER']}/datasets/{eval_dataset_id}/
rsync -ah --info=progress2 {VAL_DATA_DIR}/labels ~/shared/users/{os.environ['USER']}/datasets/{eval_dataset_id}/
Convert the dataset
After the dataset has been uploaded, convert the dataset to tfrecords through the dataset-convert action. All object detection models require dataset conversion, but some models from other domains, like classification, can operate on the raw data uploaded.
train_convert_job_id = subprocess.getoutput(f"tao-client {model_name} dataset-convert --id {train_dataset_id} --action {convert_action} ")
Configure the AutoML parameters
The next step is to choose which AutoML algorithm to run. There are options to tweak some AutoML-specific parameters. You can view the parameters that are enabled by default for the AutoML search for a model, along with all the parameters that are available for a network
tao-client {model_name} model-automl-defaults --id {model_id} | tee ~/shared/users/{os.environ['USER']}/models/{model_id}/specs/automl_defaults.json
This outputs a list of hyperparameters that are used for AutoML. For this experiment, you are choosing five different hyperparameters to sweep.
[
"bbox_rasterizer_config.deadzone_radius",
"training_config.learning_rate.soft_start_annealing_schedule.min_learning_rate",   "training_config.learning_rate.soft_start_annealing_schedule.annealing",
"training_config.regularizer.type",
"classwise_config.postprocessing_config.clustering_config.dbscan_confidence_threshold"
]
You can add additional parameters or remove existing defaulted parameters. For example, to sweep the soft_start hyperparameter, add the following in your notebook:
additional_automl_parameters = [“training_config.learning_rate.soft_start_annealing_schedule.soft_start”]
There are also options to tweak algorithm-specific parameters, but the default parameters work well. For more information, see AutoML.
Train with AutoML
At this point, you have all the tools necessary to start the AutoML run. You can also change default training specs, like image extension or class mapping, before triggering the AutoML run:
train_job_id = subprocess.getoutput(f"tao-client {model_name} model-train --id " + model_id)
When AutoML run starts, you can see various stats, such as the best accuracy score at that time, how many experiments have been completed, an approximate estimated time for completion, and so on. You should see an output log similar to the following.
{
  "best_map": 0.59636,
  "Estimated time for automl completion": "23.13 minutes remaining approximately",
  "Current experiment number": 3,
  "Number of epochs yet to start": 429.0,
  "Time per epoch in seconds": 3.24
}
Compare models
At the end of the AutoML run, you can see the results of all experiments. You are presented with the spec file and the binary weight file of the model achieving the highest accuracy among the AutoML sweeps.
Checkpoints for the best performing experiment
Folder: /home/nvidia/shared/users/95af85a9-805c-5680-b01a-3c85ed70f009/models/4f22c462-1d97-4537-99b2-15ee69eb2660/168d6149-6c47-40e6-b6a3-267867cea551/best_model/weights
Files: [epoch-80.tlt']

Results of all experiments
    id   result
0    0  0.43636
1    1  0.41818
2    2  0.53636
3    3  0.44545
4    4  0.33636
5    5  0.44545
6    6  0.53636
7    7  0.53636
8    8  0.61636
9    9  0.62727
10  10  0.593636
11  11  0.52727
12  12  0.53636
13  13  0.54545
14  14  0.61636
15  15  0.60909
16  16  0.5636
17  17  0.54545
18  18  0.53636
19  19  0.53636
The spec file for the best-performing experiment is stored in the following directory:
{home}/shared/users/{os.environ['USER']}/models/{model_id}/{train_job_id}/{automl_job_dir}/best_model
The best model for this experiment was ID 9 with a mAP of 0.627. This is stored in the best_model/recommendataion_9.kitti file.
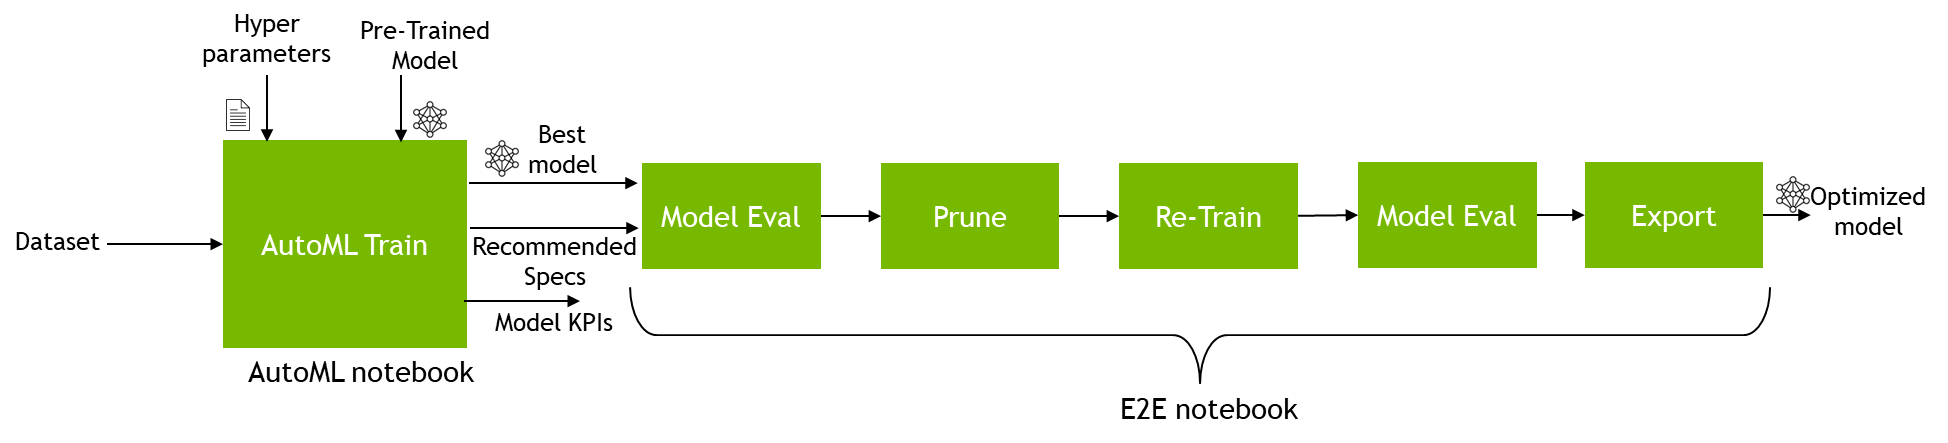
After saving the best model obtained from AutoML, you can plug the model and spec file in the end-to-end notebook and then prune and optimize the model for inference.
To plug the model into the new notebook, copy the train job ID from the AutoML notebook. The AutoML train job ID is printed when you run the training job.
train_job_id = subprocess.getoutput(f"tao-client {model_name} model-train --id " + model_id)
print(train_job_id)
When you have the train job ID, open the end-to-end notebook from the notebook hierarchy from earlier. For this post, use the TAO API Starter Kit/Notebooks/client/end2end/detectnet_v2.ipynb notebook. As you have already trained a model, just run the import statement in the first cell and skip all the way down to the Run Evaluate section. In this section, create a code cell before evaluating.
train_job_id = “id_you_copied”
After adding the job_map code cell, you can evaluate the model, prune the model for compression, and even do a quantization-aware training of the original model or the pruned model as showcased in the end-to-end notebooks
Results
We trained various models with AutoML on public datasets to see how much improvement in accuracy we could achieve. We compared the best AutoML-based accuracy against a baseline accuracy number from the default spec file provided in the packages. The results are in Table 2.
- For object detection, we trained on the FLIR dataset, which contains images from both thermal and RGB sensors.
- For image classification, we used the Pascal VOC 2012 Dataset.
- For semantic segmentation, we used the ISBI dataset.
For accuracy, we used mAP (mean average precision) for object detection, average accuracy of all classes and tasks for image classification, and mean IoU (intersection over union) score for semantic segmentation.
| Task | Model | Baseline Accuracy (default spec) | Best AutoML accuracy | Dataset |
| Object Detection | DetectNet_v2 – ResNet18 | 44.16 | 51.37 | FLIR |
| Object Detection | FasterRCNN – ResNet18 | 56.42 | 60.44 | FLIR |
| Object Detection | YOLOv4 – ResNet18 | 40.12 | 63.46 | FLIR |
| Object Detection | YOLOv3 – ResNet18 | 42.36 | 61.84 | FLIR |
| Object Detection | RetinaNet – ResNet18 | 50.54 | 63.09 | FLIR |
| Image Classification | ResNet18 | 53.95 | 66.28 | Pascal VOC |
| Semantic Segmentation | UNET | 71.64 | 76.65 | ISBI |
Across all the models that we tested, the increase in model accuracy is substantial compared to static default hyperparameters. The amount of improvement varies depending on the model, but we have generally seen improvements ranging from 5% to more than 20%. This shows that AutoML can work on various datasets to train the best model for a given KPI.
Summary
As the number of use cases and customization grows, it becomes imperative to accelerate the AI creation process. AutoML can eliminate the need for manual tuning, saving valuable time for developers.
With TAO AutoML, you can now automatically tune models for object detection, classification, and segmentation use cases using various popular model architectures. TAO AutoML provides simplicity for novice users to get started, as well as configurability for experts to choose their own hyperparameters to sweep.